No you are the only one [emoji23] I need to start a thread in hereciclo wrote:Thanks Adam.
I love your T5, after your latest mod's. Have you mentioned it in any forum?
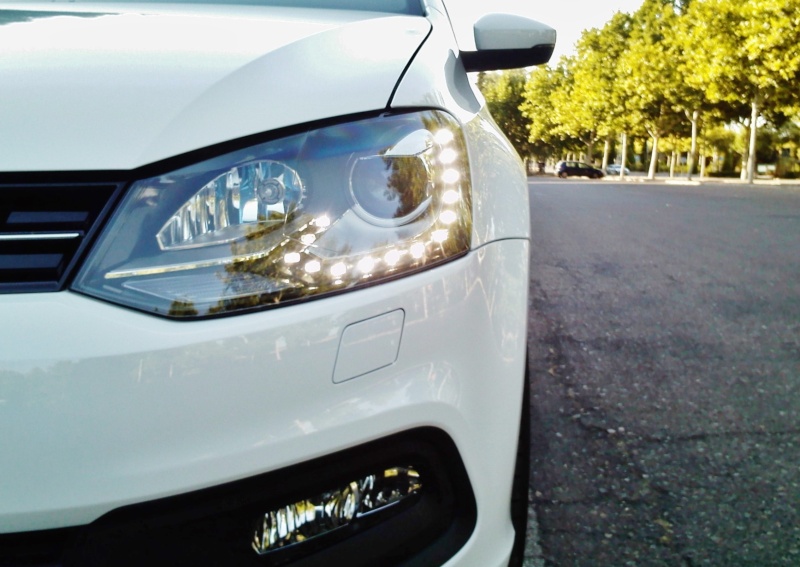
Auto headlight retrofit. VW Transporter. T5 (2010-2015)
Re: Auto headlight retrofit
-
ciclo
- Bling Bling Diamond Member
- Posts: 7803
- Joined: Sun Feb 24, 2013 10:20 am
- Drives: 6R'13/G7.5'19
- Location: Earth ♥, sPAIN, Magiclands (Mordor).
- Contact:
Re: Auto headlight retrofit
Ok...
I mean, the relay holder you're installed in your automatic light wiring is not right to fit it here:
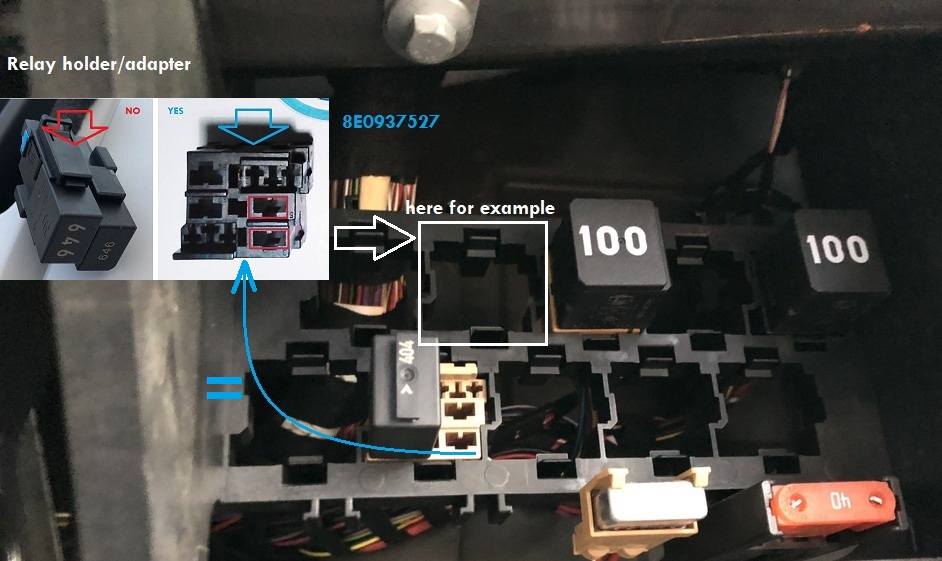
The correct one is 8E0937527. OEM
No problem I will make a new wiring for your automatic lights (a gift) along with another part of the wiring (wiring for BCM MAX adaptation) of which we will talk later.
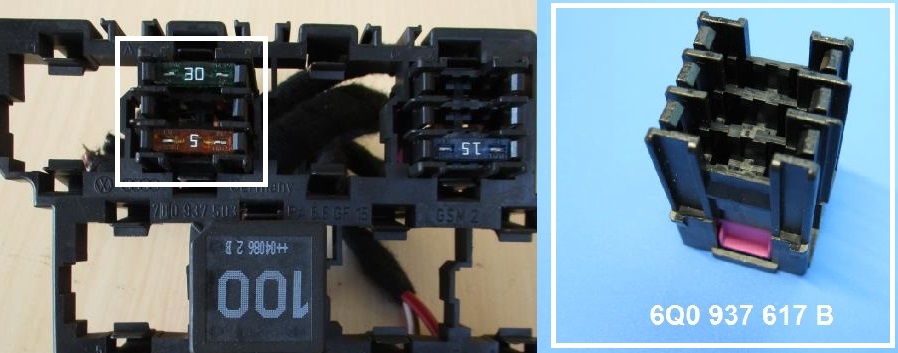
Btw, buy this fuse holder (below), it is the best solution for the BCM feed in your T5, to fit it in another of the available holes in the relay carrier (above), we will use two slots with 30A fuses, maybe all three. OEM
---
The RLS and MFSW we leave for later, there are still many things to explain.
-
ciclo
- Bling Bling Diamond Member
- Posts: 7803
- Joined: Sun Feb 24, 2013 10:20 am
- Drives: 6R'13/G7.5'19
- Location: Earth ♥, sPAIN, Magiclands (Mordor).
- Contact:
Re: Auto headlight retrofit
As I mentioned earlier we would do this work in three phases/steps/stages, from easy to difficult.
The first step was to improve the Kufatec harness for your T5. (Bixenon headlights)
The second step is to improve the 6R wiring for automatic lights for any T5 8K0/8K1.
The last step will be to modify the original electrical installation - Fusebox, BCM, Light Switch - (it's absolutely necessary).
-----
Let's go with the second step:
Diagrams for automatic lights wiring on VW T5 8K0/8K1 (H4 and H7 Headlights)
H4

H7
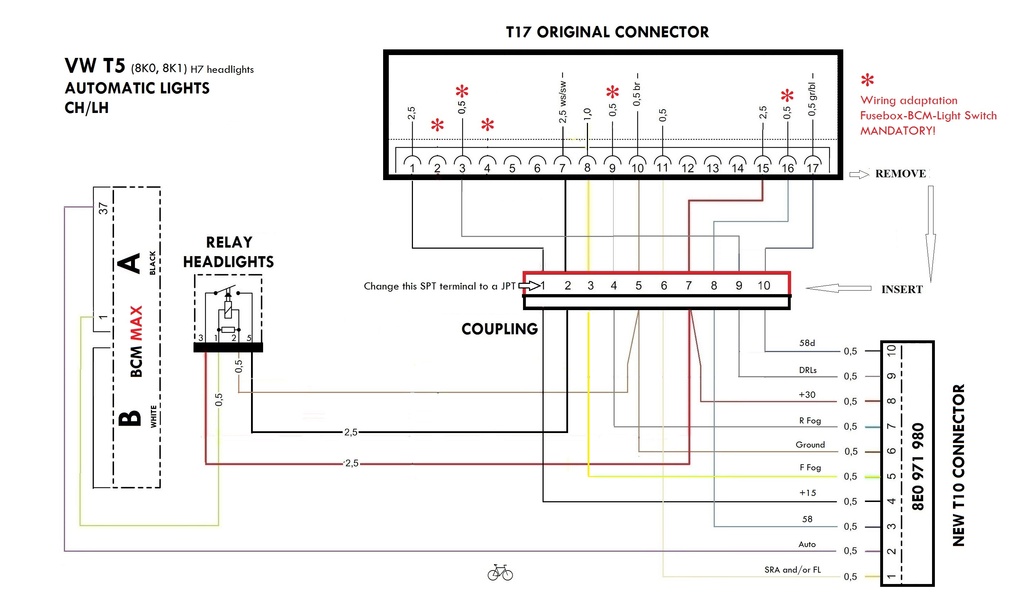
 Link to enlarge or download the diagrams.
If the correspondence between the T17 original connector and the new T10 connector is maintained as shown in the diagrams it does not matter if you choose another correspondence in the COUPLING/S.
The first step was to improve the Kufatec harness for your T5. (Bixenon headlights)
The second step is to improve the 6R wiring for automatic lights for any T5 8K0/8K1.
The last step will be to modify the original electrical installation - Fusebox, BCM, Light Switch - (it's absolutely necessary).
-----
Let's go with the second step:
Diagrams for automatic lights wiring on VW T5 8K0/8K1 (H4 and H7 Headlights)
H4
H7
If the correspondence between the T17 original connector and the new T10 connector is maintained as shown in the diagrams it does not matter if you choose another correspondence in the COUPLING/S.
-
graylscott
- Getting There!
- Posts: 50
- Joined: Sun Nov 12, 2017 11:13 pm
- Drives: T5GP
- Location: Chester
Re: Auto headlight retrofit
Wow! Thanks! I totally misunderstood! When you said a gift, I thought you meant your knowledge!
Of course I will pay for any parts you supply! (Or at least a donation to your cause - which is extremely important!)
I will order one of these tomorrow!
-
graylscott
- Getting There!
- Posts: 50
- Joined: Sun Nov 12, 2017 11:13 pm
- Drives: T5GP
- Location: Chester
Re: Auto headlight retrofit
This is starting to make much more sense nowciclo wrote: ↑Sun Jan 07, 2018 6:17 am As I mentioned earlier we would do this work in three phases/steps/stages, from easy to difficult.
The first step was to improve the Kufatec harness for your T5. (Bixenon headlights)
The second step is to improve the 6R wiring for automatic lights for any T5 8K0/8K1.
The last step will be to modify the original electrical installation - Fusebox, BCM, Light Switch - (it's absolutely necessary).
-----
Let's go with the second step:
Diagrams for automatic lights wiring on VW T5 8K0/8K1 (H4 and H7 Headlights)
If the correspondence between the T17 original connector and the new T10 connector is maintained as shown in the diagrams it does not matter if you choose another correspondence in the COUPLING/S.
-
ciclo
- Bling Bling Diamond Member
- Posts: 7803
- Joined: Sun Feb 24, 2013 10:20 am
- Drives: 6R'13/G7.5'19
- Location: Earth ♥, sPAIN, Magiclands (Mordor).
- Contact:
Re: Auto headlight retrofit
Let's go with the third and last step:
Wiring adaptation. E-box-SB Fusebox-BCM-Light Switch.
It consists in feeding the BCM and getting the lights to be managed by it.
We will divide it in three steps (again) depending on the set of wires that must go in the same wiring loom.
1- From the E-box to the new fuse holder (3 fuses) and from here to the BCM.
2- From the SB fuse holder to the BCM.
3- From the light switch to the BCM.
1- From the E-box to the new fuse holder (3 fuses) and from here to the BCM.
Based on the original diagrams.
Remove the battery to reach the main fuse holder SA.
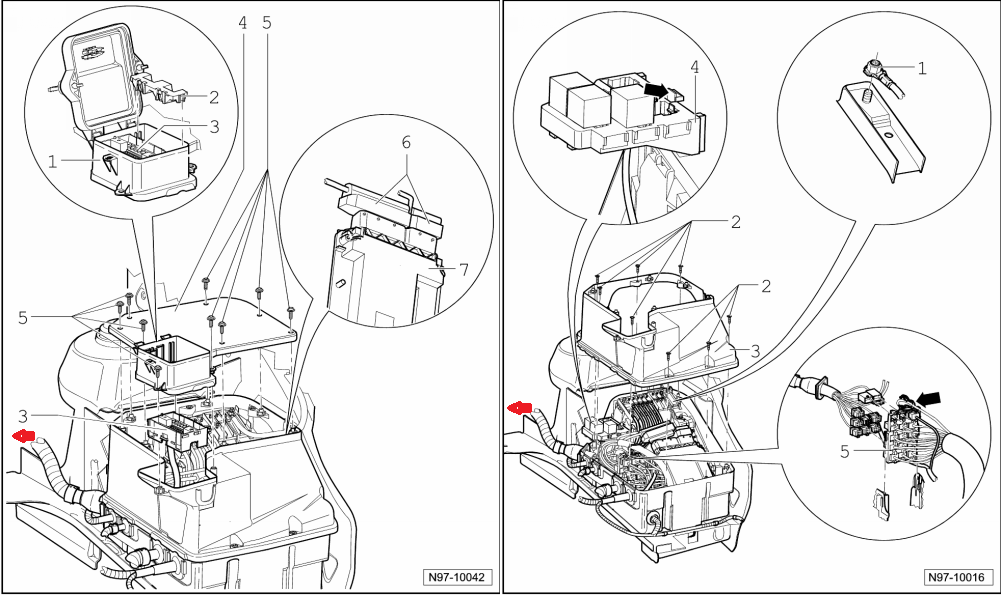
Run two 2,5 mm2 automotive wires from the E-box to the BCM as indicated in the following image.
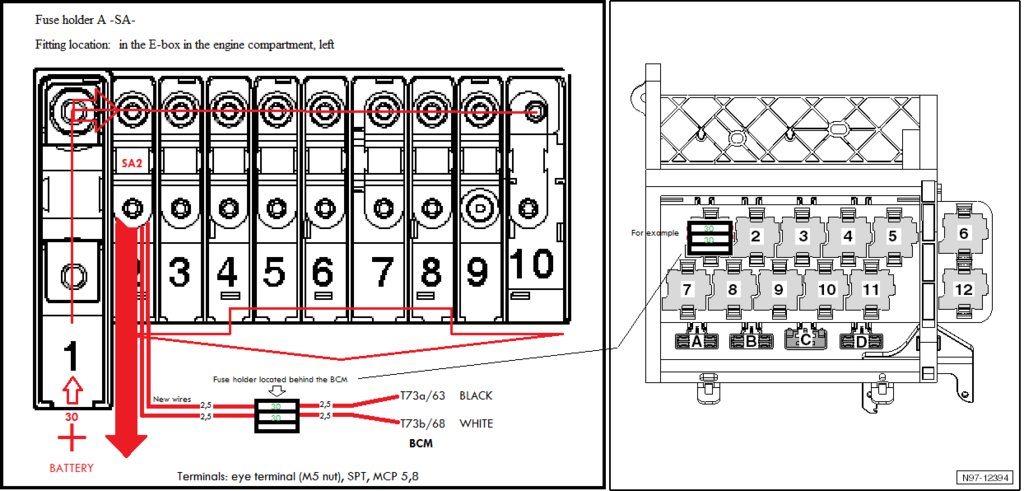
Click here to enlarge the above image.
For the two wires crimped in the same eye terminal.
Note: The electrical consumption will remain the same due to the wiring adaptation.
2- From the SB fuse holder to the BCM.
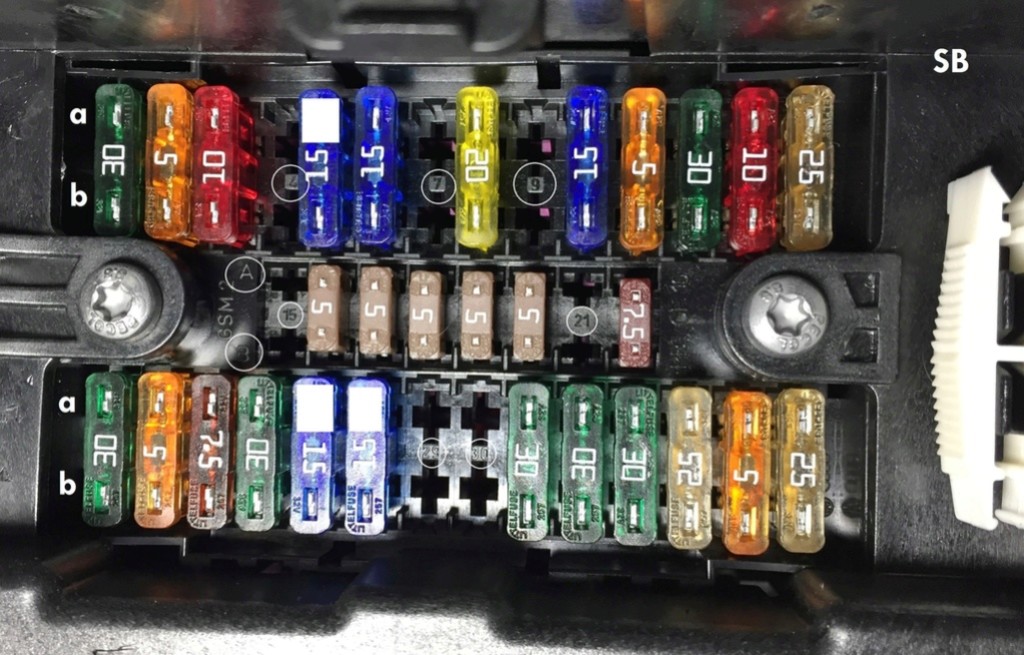
Low Beam
Remove & isolate original wires 5a, 27a.
Install
SB5 (15A), new 1,5mm2 wire from 5a to T73a/2 BCM black connector. Low Beam Left
SB27 (15A), new 1,5 mm2 wire from 27a to T73b/2 BCM white connector. Low Beam Right
Use the same fuses.
High Beam signal
Remove SB28a wire and add/splice/crimp a new 0.5 mm2 wire to the removed wire. Carry this new wire up to T73a/62 BCM black connector.
Reinstall the SB28a original wire in its slot/place. Use the same fuse.
Note: This new wire will make the xenon lamps stay on when switching with the stalk to high beam.
Terminals: SPT, MCP 2,8, MQS
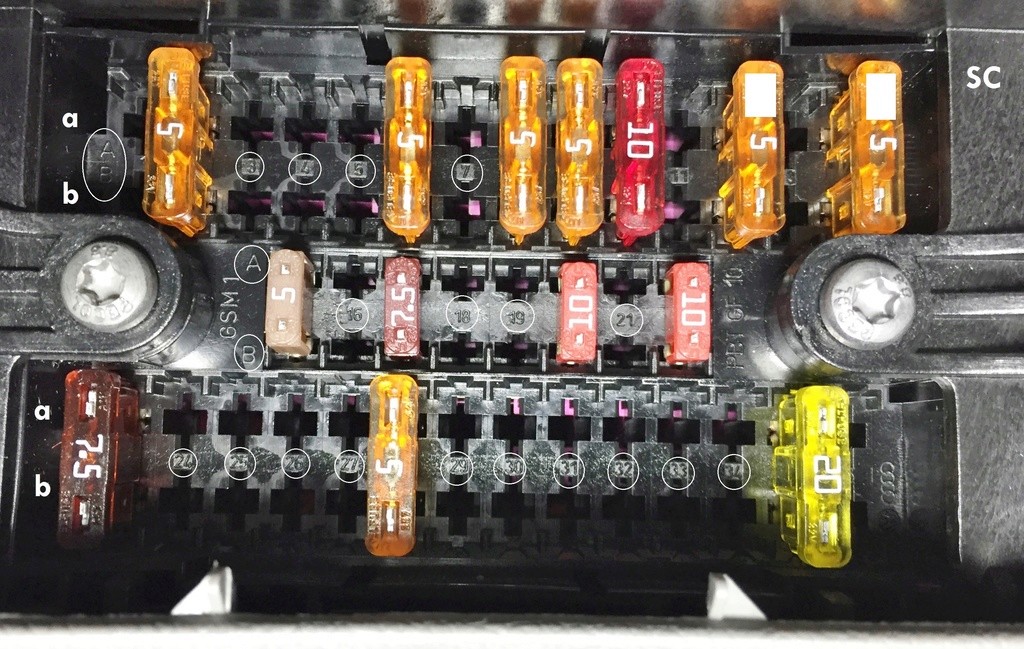
DRLs
You must do this step for DRLs only if you want to install automatic lights but not Bixenon headlights.
If you install the Bixenon headlights + auto lights you must do the same procedure explained previously for graylscott in the Kufatec harness.
Remove & isolate original wires 12a (SC12 5A fuse) and 14a (SC14 5A fuse).
Install
New 0,5mm wire from 12a to T73b/3 . Left DRL
New 0,5mm wire from 14a to T73a/5. Right DRL
Use the same fuses.
Terminals: SPT, MCP 1,5
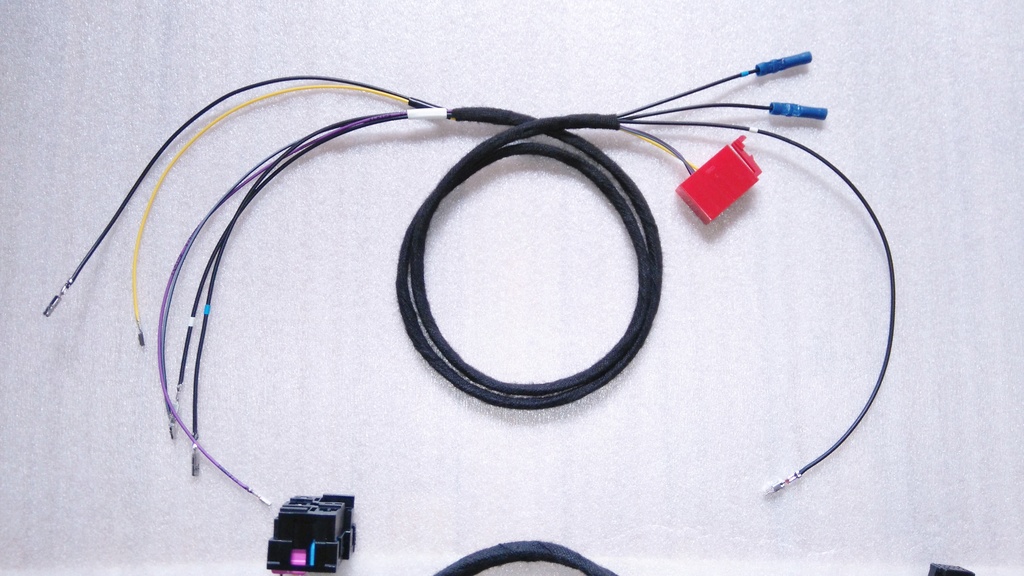
3- From the light switch to the BCM.
General view.
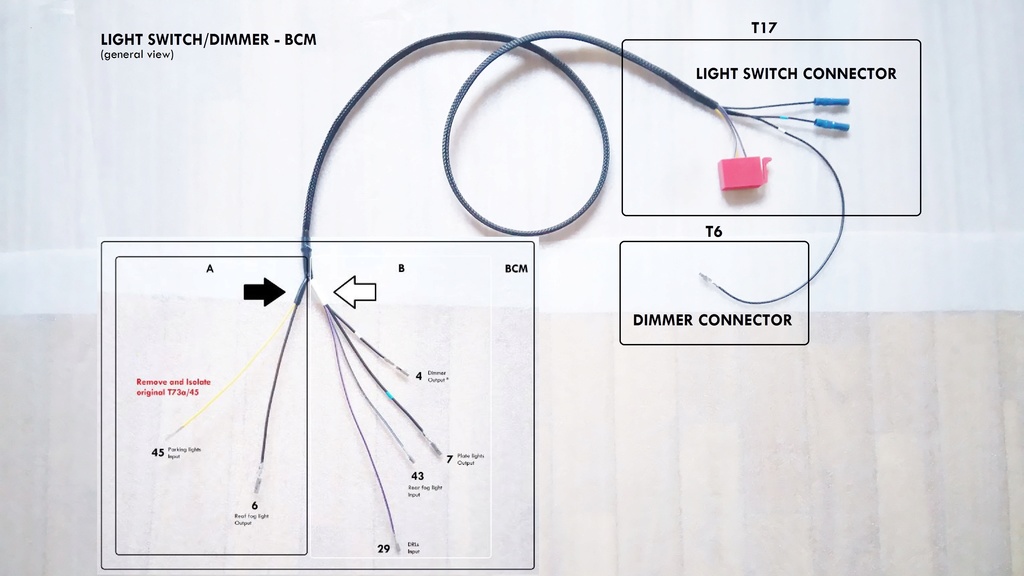


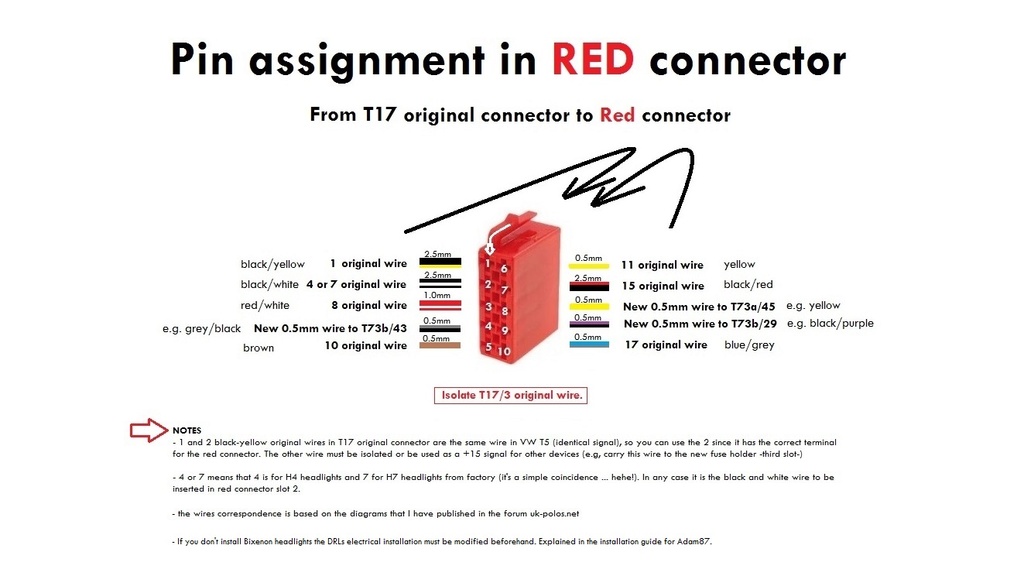
Additional NOTE:
In case you have a T5 with H7 headlights from factory the original T17/4 wire (yellow-green) must be isolated.
Link to enlarge o download these images.
A real example of this wiring plus the wiring for automatic lights.
---
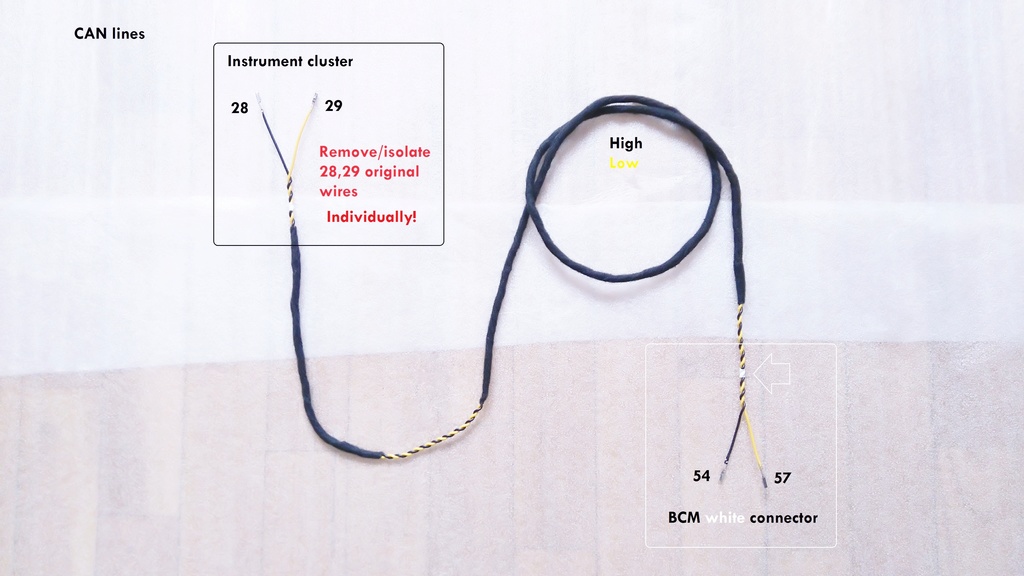
Other wires
CAN lines
Essential when you upgrade to the following BCM Max.
7H0937090D, 7E0937090 /B/C... (I'm talking about the 434/3 Mhz used in Europe and other places, for the 315Mhz the Ref. number will be different)
Reversing Light. Only with manual gearbox.
New 1.0mm2 wire from T73b/12 to T10o/3, beneath the driver's seat.
Remove & isolate original T10o/3.
Note: T10o is Blue color, the original wire is green/black. Use the multiemeter to be sure.
If you don't install this wire you'll have a fault in BCM diagnosis, which can be avoided by coding...
---
Ah yes, the music accompanies me to all the places where I go ...
Wiring adaptation. E-box-SB Fusebox-BCM-Light Switch.
It consists in feeding the BCM and getting the lights to be managed by it.
We will divide it in three steps (again) depending on the set of wires that must go in the same wiring loom.
1- From the E-box to the new fuse holder (3 fuses) and from here to the BCM.
2- From the SB fuse holder to the BCM.
3- From the light switch to the BCM.
1- From the E-box to the new fuse holder (3 fuses) and from here to the BCM.
Based on the original diagrams.
Remove the battery to reach the main fuse holder SA.
Run two 2,5 mm2 automotive wires from the E-box to the BCM as indicated in the following image.
For the two wires crimped in the same eye terminal.
Note: The electrical consumption will remain the same due to the wiring adaptation.
2- From the SB fuse holder to the BCM.
Low Beam
Remove & isolate original wires 5a, 27a.
Install
SB5 (15A), new 1,5mm2 wire from 5a to T73a/2 BCM black connector. Low Beam Left
SB27 (15A), new 1,5 mm2 wire from 27a to T73b/2 BCM white connector. Low Beam Right
Use the same fuses.
High Beam signal
Remove SB28a wire and add/splice/crimp a new 0.5 mm2 wire to the removed wire. Carry this new wire up to T73a/62 BCM black connector.
Reinstall the SB28a original wire in its slot/place. Use the same fuse.
Note: This new wire will make the xenon lamps stay on when switching with the stalk to high beam.
Terminals: SPT, MCP 2,8, MQS
DRLs
You must do this step for DRLs only if you want to install automatic lights but not Bixenon headlights.
If you install the Bixenon headlights + auto lights you must do the same procedure explained previously for graylscott in the Kufatec harness.
Remove & isolate original wires 12a (SC12 5A fuse) and 14a (SC14 5A fuse).
Install
New 0,5mm wire from 12a to T73b/3 . Left DRL
New 0,5mm wire from 14a to T73a/5. Right DRL
Use the same fuses.
Terminals: SPT, MCP 1,5
3- From the light switch to the BCM.
General view.
Additional NOTE:
In case you have a T5 with H7 headlights from factory the original T17/4 wire (yellow-green) must be isolated.
---
Other wires
CAN lines
Essential when you upgrade to the following BCM Max.
7H0937090D, 7E0937090 /B/C... (I'm talking about the 434/3 Mhz used in Europe and other places, for the 315Mhz the Ref. number will be different)
Reversing Light. Only with manual gearbox.
New 1.0mm2 wire from T73b/12 to T10o/3, beneath the driver's seat.
Remove & isolate original T10o/3.
Note: T10o is Blue color, the original wire is green/black. Use the multiemeter to be sure.
If you don't install this wire you'll have a fault in BCM diagnosis, which can be avoided by coding...
---
Ah yes, the music accompanies me to all the places where I go ...
-
graylscott
- Getting There!
- Posts: 50
- Joined: Sun Nov 12, 2017 11:13 pm
- Drives: T5GP
- Location: Chester
Re: Auto headlight retrofit
Amazing! Thanks once again! 
Are these changes reliant on the light switch wiring being in place or can they be done now?
What I am really asking is can I make the changes prior to the headlight harness without affecting current light function?
At the moment it is dark when I drive to work and dark when I leave work so I kind of need my lights!
-
ciclo
- Bling Bling Diamond Member
- Posts: 7803
- Joined: Sun Feb 24, 2013 10:20 am
- Drives: 6R'13/G7.5'19
- Location: Earth ♥, sPAIN, Magiclands (Mordor).
- Contact:
Re: Auto headlight retrofit
I had already thought about it.
And I wonder how I can answer you so that others who read this topic don't read or do what I am going to tell you now ...
You can do steps 1 and 2 of the wiring adaptation with the next setting.
- Kufatec harness installed.
- Bixenon headlights installed.
- Original light switch installed. (with PIN T17/3 removed and isolated)
- The final BCM coding I told you.
You'll have almost all the lights working (DRLs not), but you'll have some faults in the Autoscan if you do it, and the warning lamp in the IC.
If possible, take photos of steps 1 and 2 wiring adaptation. They will be very useful for you and also for those who read this topic.
----
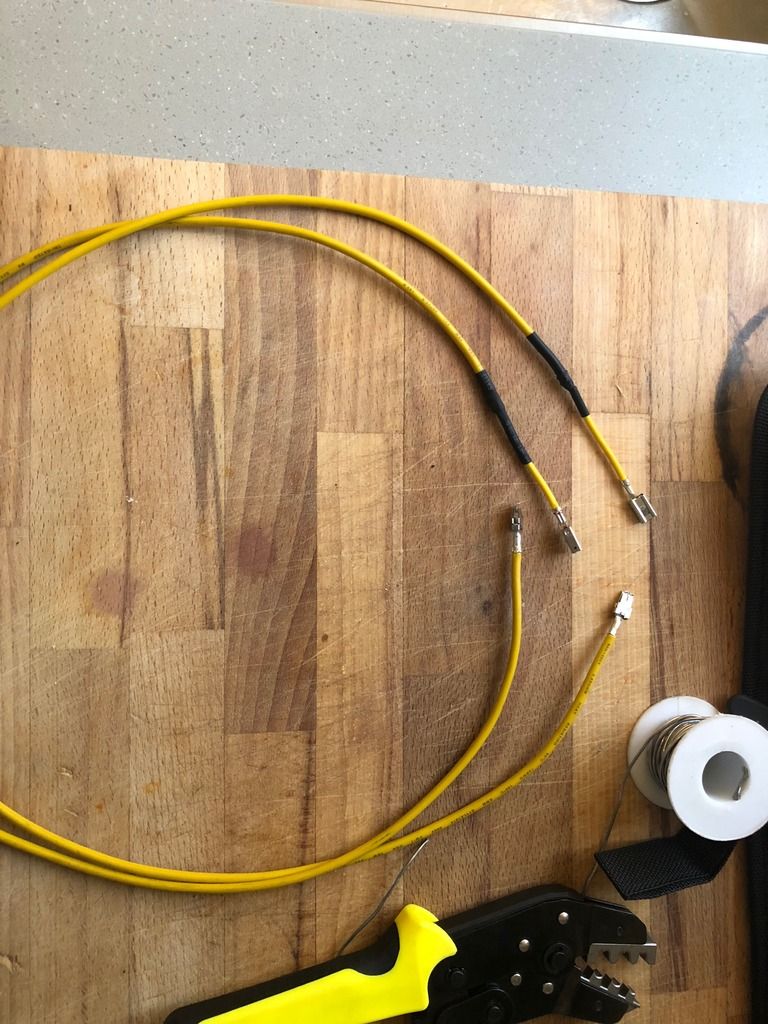
I will manufacture your new automatic light wiring and the third part/step of the wiring adaptation (ASAP). As I told you, it will be a gift that I will send you, you only have to pay the shipping costs (€ 10).
I have several reasons to send you this gift, apart from the great collaboration on your part in this topic.
Btw, you have to purchase the Dimmer without headlights range regulator 6Q0941334 and install it with my wiring.
Btw2, the wiring of automatic lights that you showed us has an excellent appearance, you did a good job!.
And I wonder how I can answer you so that others who read this topic don't read or do what I am going to tell you now ...
You can do steps 1 and 2 of the wiring adaptation with the next setting.
- Kufatec harness installed.
- Bixenon headlights installed.
- Original light switch installed. (with PIN T17/3 removed and isolated)
- The final BCM coding I told you.
You'll have almost all the lights working (DRLs not), but you'll have some faults in the Autoscan if you do it, and the warning lamp in the IC.
If possible, take photos of steps 1 and 2 wiring adaptation. They will be very useful for you and also for those who read this topic.
----
I will manufacture your new automatic light wiring and the third part/step of the wiring adaptation (ASAP). As I told you, it will be a gift that I will send you, you only have to pay the shipping costs (€ 10).
I have several reasons to send you this gift, apart from the great collaboration on your part in this topic.
Btw, you have to purchase the Dimmer without headlights range regulator 6Q0941334 and install it with my wiring.
Btw2, the wiring of automatic lights that you showed us has an excellent appearance, you did a good job!.
-
graylscott
- Getting There!
- Posts: 50
- Joined: Sun Nov 12, 2017 11:13 pm
- Drives: T5GP
- Location: Chester
Re: Auto headlight retrofit
Fantastic news! I was hoping you'd say that! I want to have some fun this weekend!
Kufatec harness - Check
Xenons - Check
Coding - Check
T17/3 removal - We'll call that 'Step 0'
I expected as much.... The more errors the better though! (I listened)
I will certainly take plenty of photos and upload once done!
I seriously can't thank you enough! Let me know how to send you the money and I can do that straight away.ciclo wrote: ↑Tue Jan 09, 2018 4:48 am I will manufacture your new automatic light wiring and the third part/step of the wiring adaptation (ASAP). As I told you, it will be a gift that I will send you, you only have to pay the shipping costs (€ 10).
I have several reasons to send you this gift, apart from the great collaboration on your part in this topic.
It it will be done
-
ciclo
- Bling Bling Diamond Member
- Posts: 7803
- Joined: Sun Feb 24, 2013 10:20 am
- Drives: 6R'13/G7.5'19
- Location: Earth ♥, sPAIN, Magiclands (Mordor).
- Contact:
Re: Auto headlight retrofit
Wiring for graylscott

From the light switch to the BCM.
More info here.
Wiring for Automatic lights.

Yellow/black wire to T73a/1
Green/black wire to T73a/37
Is easier than it looks like, "from-to".
If you want me to make these wiring for you, read at the end of this sale. Where says 'D'.
If you need to code your new BCM, contact me here in the forum.
graylscott, shortly I send you a private message with my email.
From the light switch to the BCM.
More info
Wiring for Automatic lights.
Yellow/black wire to T73a/1
Green/black wire to T73a/37
Is easier than it looks like, "from-to".
If you want me to make these wiring for you, read at the end of this sale.
If you need to code your new BCM, contact me here in the forum.
graylscott, shortly I send you a private message with my email.
-
ciclo
- Bling Bling Diamond Member
- Posts: 7803
- Joined: Sun Feb 24, 2013 10:20 am
- Drives: 6R'13/G7.5'19
- Location: Earth ♥, sPAIN, Magiclands (Mordor).
- Contact:
Re: Auto headlight retrofit
The two wiring looms are on the way, 7 to 10 days to arrive -SP to UK-, for you install them, and we'll see your pretty T5 with its Bixenon headlights and automatic lights working stupendously. 
Meanwhile we continue with the previous installations watching those entertaining images of the process. It's the part I like the most, please do not skimp on details.
Btw, what is the exact name with which your VW T5 is known ... T5GP, T5.1? please enlighten me, thanks.
Meanwhile we continue with the previous installations watching those entertaining images of the process. It's the part I like the most, please do not skimp on details.
Btw, what is the exact name with which your VW T5 is known ... T5GP, T5.1? please enlighten me, thanks.
-
graylscott
- Getting There!
- Posts: 50
- Joined: Sun Nov 12, 2017 11:13 pm
- Drives: T5GP
- Location: Chester
Re: Auto headlight retrofit. VW Transporter. T5 (2010-2015)
Thanks you so much Fernando!
You are not going to be happy with me though, I forgot to take photographs of the engine bay fuse wiring! I remembered after having put everything back together.
The diagram for step one is very accurate though!
Firsly, it is not clear in the diagram, but the unit which contains the fuse in question sits underneath the van's battery. I tackled this in the following order.
1. Removed the negative battery terminal.
2. Removed the positive battery terminal.
3. Removed the battery completely from the engine bay.
4. Removed the 4 bolts holding the battery tray in place and removed battery tray from engine bay.
5. (This is where the diagram kicks in) Remove the 9 screws from the top of the electrical box.
6. Remove the lid and you will now see the 'SA' fusebox.
7. Remove the M5 nut from Terminal 2.
8. Connected the two new 2.5mm wires to the terminal with a ring terminal and screwed the nut back into place.
9. (This is where I freestyled a little) I poked a small hole in one of the cable grommets in the to bring the wire out of the electrical box.
10. Ran some silicone around the hole to reseal properly.
11. Reversed steps 1-6.
12. Remembered I was supposed to take photos.
In this photo, you can see the two wires (wrapped in fabric tape) coming from underneath the battery tray.
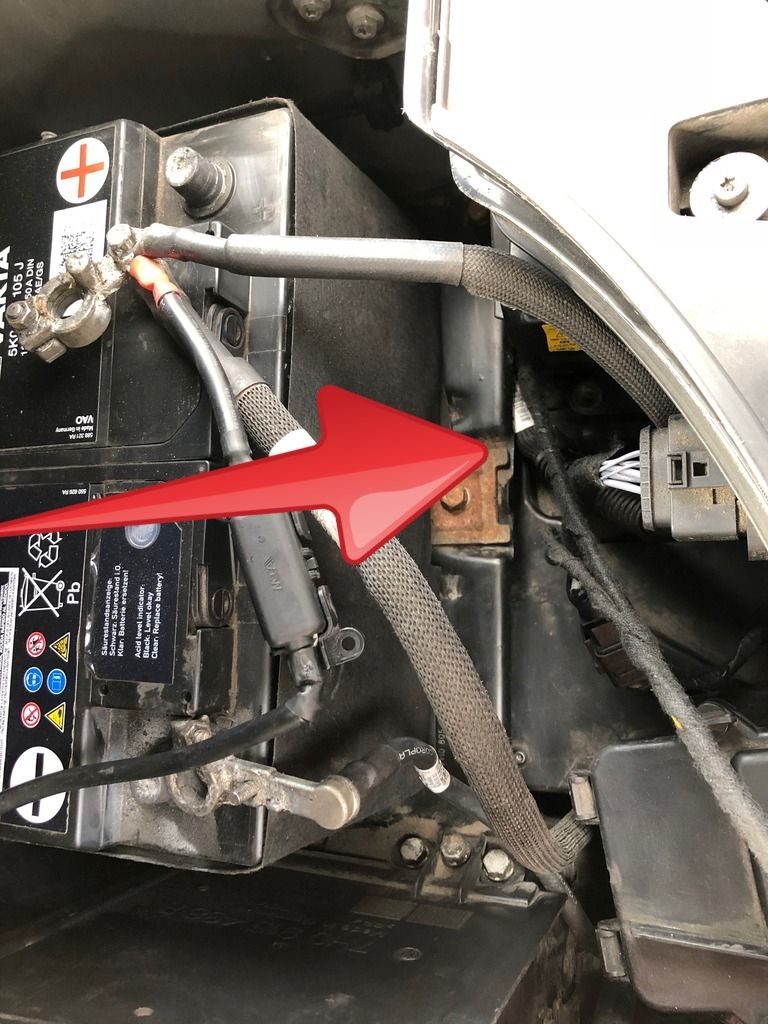
As I already have a wire running around the front of the engine bay for the Xenon headlights, I taped the new wires into this to keep everything tidy
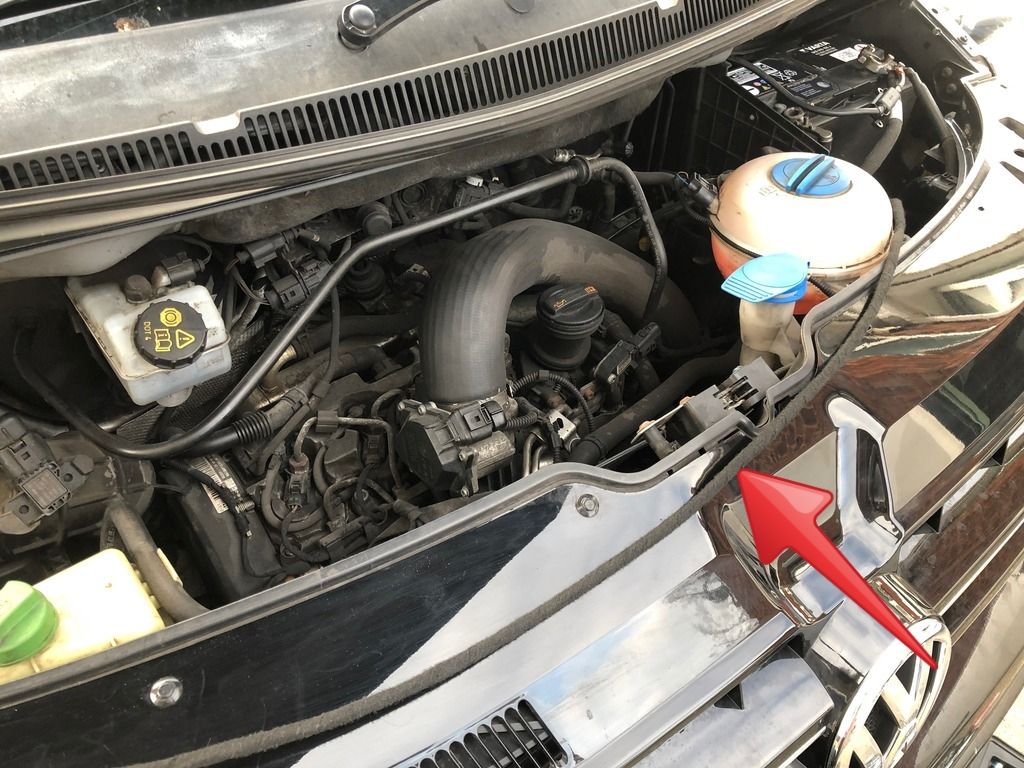
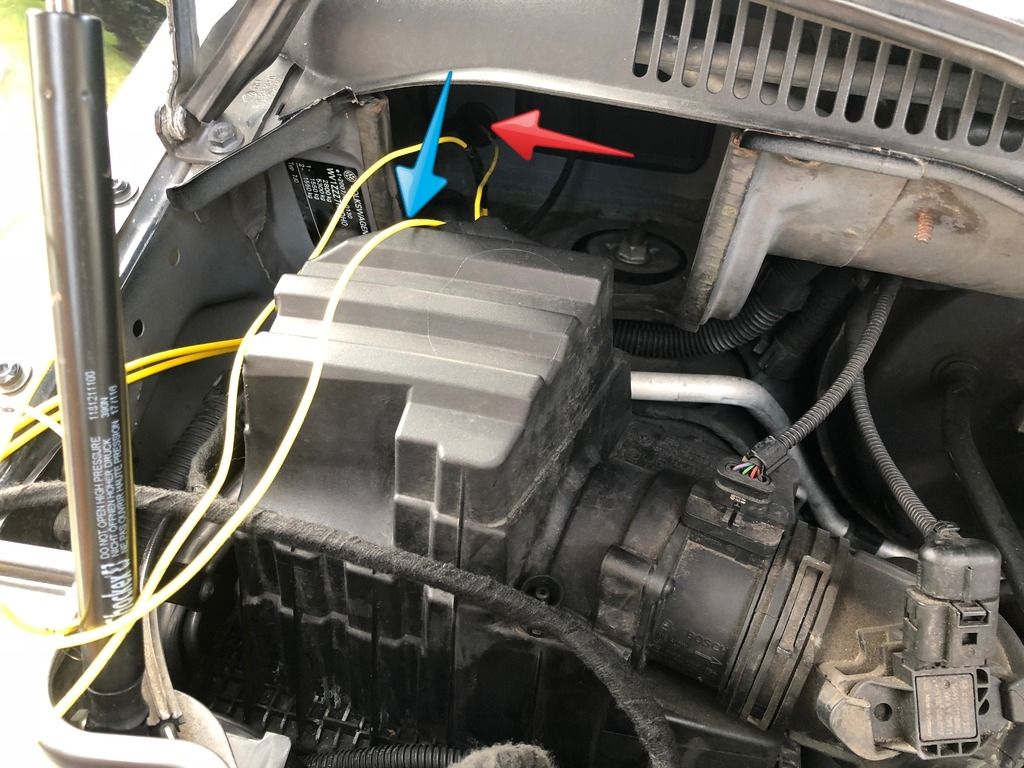
I then ran the wires through the firewall via the strut access panel under the windscreen wiper shield. There is a rubber grommet from the engine bay to the strut box (blue arrow) and one from the strut box to the inside of the van (red arrow) It will bring you out right behind the BCM.
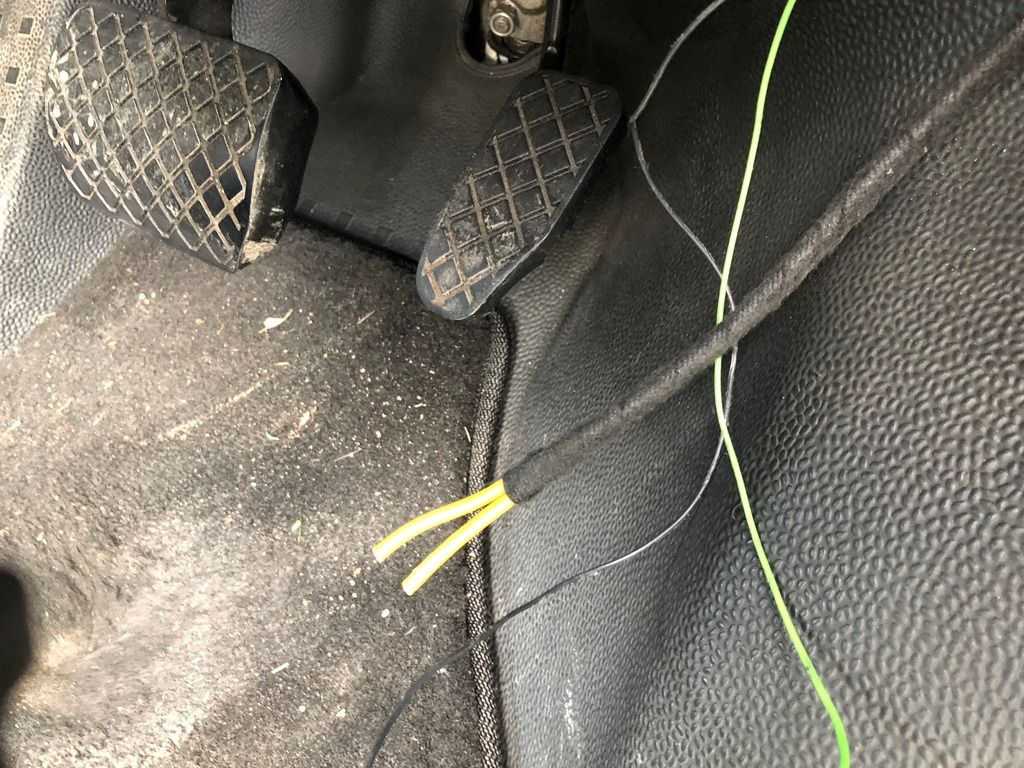
Pulled the two wires down to the drivers footwell and cut to length.
Crimped on two SPT terminals to the two wires which will go to the fuse holder, then created two short wires with SPT terminals one end and MCP5.8 on the other.
Plugged the SPT terminals into the fuse holder in order to fuse each if the wires that had come from the engine bay.

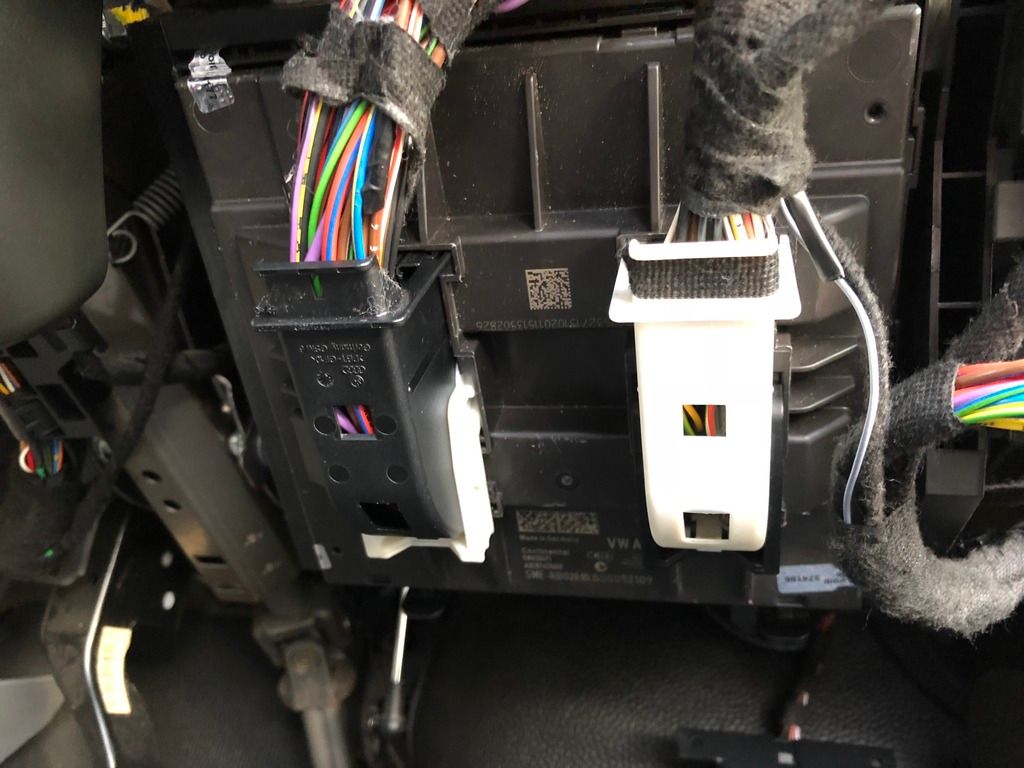
I then connected the two MCP5.8 connectors into the BCM. One to T73a/63 (black) and the other T73b/68 (white)
Step 2 is where I fall off the wagon with my photo taking again! Sorry!
Firstly, I removed the fuse holder from it's mount and pulled it to one side for better access.
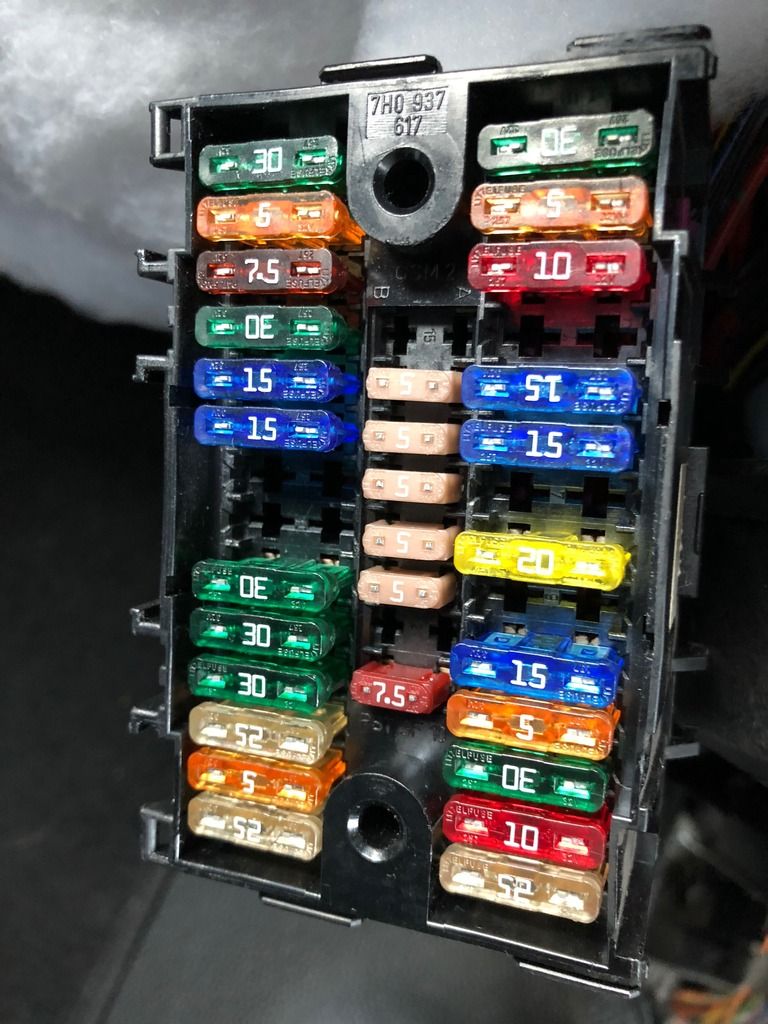
I removed and isolated terminals 5a and 27a from the fuse holder.
It took me longer than I'd care to admit to work out that a terminal tool alone will not allow you to remove terminals from the fusebox.
You must slide the purple frame about 5mm to the left (looking at it as pictured) while holding the terminal tool in place. Then pull the wire out. 3 hands would help at this point.
This is where the photos tail off again i'm afraid. Sorry!
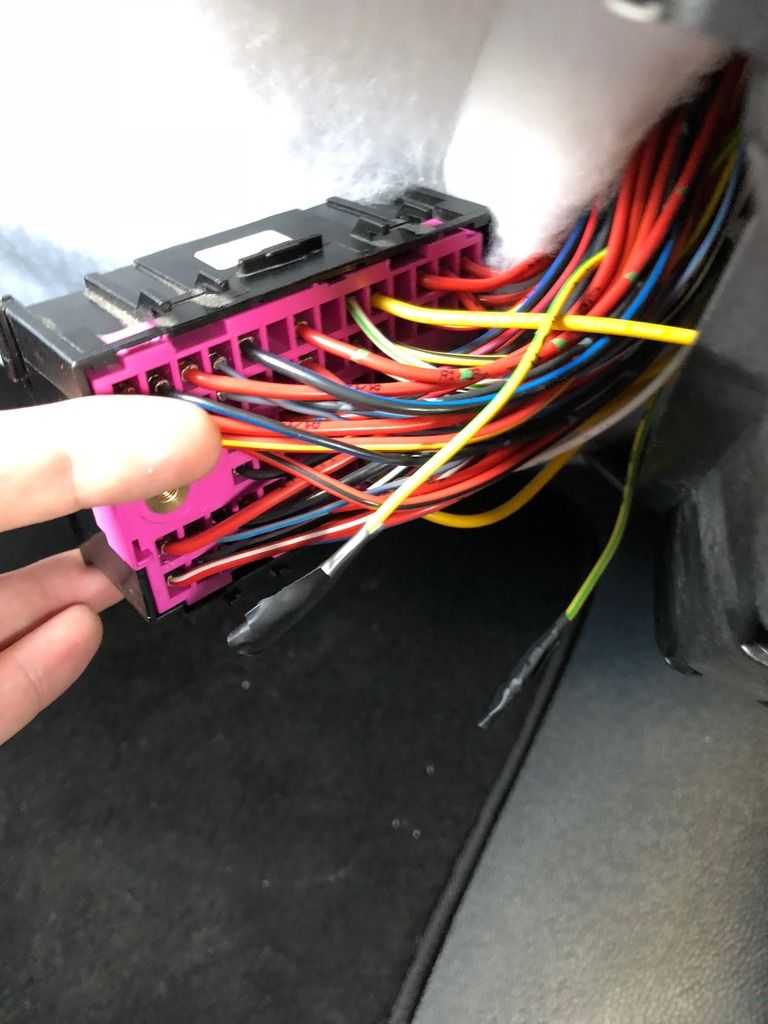
I then removed terminal SB28a from the fusebox and re-crimped the original wire adding a new 0.5mm wire along with it.
I then taped all three wires together with fabric tape (after marking the ends to know which was which) and ran them through the back of the dash to the BCM.
I then crimped the correct terminals onto the wires, and connected them to the BCM as per ciclo's instructions.
Once I confirmed everything was working as expected, I tidied and secured all new wires to stop them from moving.
Once again, my apologies for the lack of photos, but hope this helps a little.
You are not going to be happy with me though, I forgot to take photographs of the engine bay fuse wiring! I remembered after having put everything back together.
The diagram for step one is very accurate though!
Firsly, it is not clear in the diagram, but the unit which contains the fuse in question sits underneath the van's battery. I tackled this in the following order.
1. Removed the negative battery terminal.
2. Removed the positive battery terminal.
3. Removed the battery completely from the engine bay.
4. Removed the 4 bolts holding the battery tray in place and removed battery tray from engine bay.
5. (This is where the diagram kicks in) Remove the 9 screws from the top of the electrical box.
6. Remove the lid and you will now see the 'SA' fusebox.
7. Remove the M5 nut from Terminal 2.
8. Connected the two new 2.5mm wires to the terminal with a ring terminal and screwed the nut back into place.
9. (This is where I freestyled a little) I poked a small hole in one of the cable grommets in the to bring the wire out of the electrical box.
10. Ran some silicone around the hole to reseal properly.
11. Reversed steps 1-6.
12. Remembered I was supposed to take photos.
In this photo, you can see the two wires (wrapped in fabric tape) coming from underneath the battery tray.
As I already have a wire running around the front of the engine bay for the Xenon headlights, I taped the new wires into this to keep everything tidy
I then ran the wires through the firewall via the strut access panel under the windscreen wiper shield. There is a rubber grommet from the engine bay to the strut box (blue arrow) and one from the strut box to the inside of the van (red arrow) It will bring you out right behind the BCM.
Pulled the two wires down to the drivers footwell and cut to length.
Crimped on two SPT terminals to the two wires which will go to the fuse holder, then created two short wires with SPT terminals one end and MCP5.8 on the other.
Plugged the SPT terminals into the fuse holder in order to fuse each if the wires that had come from the engine bay.
I then connected the two MCP5.8 connectors into the BCM. One to T73a/63 (black) and the other T73b/68 (white)
Step 2 is where I fall off the wagon with my photo taking again! Sorry!
Firstly, I removed the fuse holder from it's mount and pulled it to one side for better access.
I removed and isolated terminals 5a and 27a from the fuse holder.
It took me longer than I'd care to admit to work out that a terminal tool alone will not allow you to remove terminals from the fusebox.
You must slide the purple frame about 5mm to the left (looking at it as pictured) while holding the terminal tool in place. Then pull the wire out. 3 hands would help at this point.
This is where the photos tail off again i'm afraid. Sorry!
I then removed terminal SB28a from the fusebox and re-crimped the original wire adding a new 0.5mm wire along with it.
I then taped all three wires together with fabric tape (after marking the ends to know which was which) and ran them through the back of the dash to the BCM.
I then crimped the correct terminals onto the wires, and connected them to the BCM as per ciclo's instructions.
Once I confirmed everything was working as expected, I tidied and secured all new wires to stop them from moving.
Once again, my apologies for the lack of photos, but hope this helps a little.
-
ciclo
- Bling Bling Diamond Member
- Posts: 7803
- Joined: Sun Feb 24, 2013 10:20 am
- Drives: 6R'13/G7.5'19
- Location: Earth ♥, sPAIN, Magiclands (Mordor).
- Contact:
Re: Auto headlight retrofit. VW Transporter. T5 (2010-2015)
All the explanation and images are of great help, everything looks correct, as it should be. Thank you very much for the images. 
"freestyle" is always necessary for new installations, no problem, in some works it is also contemplated in the Elsawin.
Great job so far, but the most important part remains to be done.
As you know the package with my wiring looms is already in the UK, so I guess you'll receive them soon.
The last step is easier to do.
-
graylscott
- Getting There!
- Posts: 50
- Joined: Sun Nov 12, 2017 11:13 pm
- Drives: T5GP
- Location: Chester
Re: Auto headlight retrofit. VW Transporter. T5 (2010-2015)
Okay, so here it goes!
First of all, I want to say what feels like my 1000th thank you to you Fernando! I received my gift earlier on this week!
This morning, I finally got enough time away from work to play!
So, all is working with the headlight switch as I would expect. All lighting is now controlled via the BCM.
However....
I still have no auto-lights.
But the plot thickens......
When I set the switch to Auto, the lights do not come on whether it is dark or light outside.
But....
When the switch is set to auto, the 'Leaving-Home' works as expected. i.e. only when it is dark, and only when the headlight switch is set to auto.
Which surely means that both the light sensing feature of the RLS is working correctly, and the 'Auto' setting on the headlight switch is working correctly.
I ran some output tests on each of the individual lights, and sure enough they are all controlled via the BCM.
Any ideas?
Thanks
Gray
-
iichel

- Bling Bling Diamond Member
- Posts: 6368
- Joined: Fri Nov 14, 2014 2:14 pm
- Drives: Polo 6R 2.0 TDI, Passat B8 2.0 TSI
- Location: http://mypassat.nl/
Re: Auto headlight retrofit. VW Transporter. T5 (2010-2015)
Is your BCM already coded for automatic lights? do you have a recent vcds autoscan?