Fair to all points,
Am waiting on the new bolt to arrive so I can get on with it, engine is all back together now, took sump and strainer off and checked it all over.
Got rid of anything old an worn and engine turns by hand / tool fine so once its all renewed I can add oil and get pressure built up for a start.
1st time getting an engine down that bare for a car I wanted to attempt to fix.
Polo 1.2 6R CGP Engine rebuild
-
UKWaffles
- New
- Posts: 28
- Joined: Fri Sep 11, 2026 1:20 pm
- Drives: Polo 1.2 6R 2009
- Location: Portsmouth
Re: Polo 1.2 6R CGP Engine rebuild
So been able to get the engine back together and running somewhat,
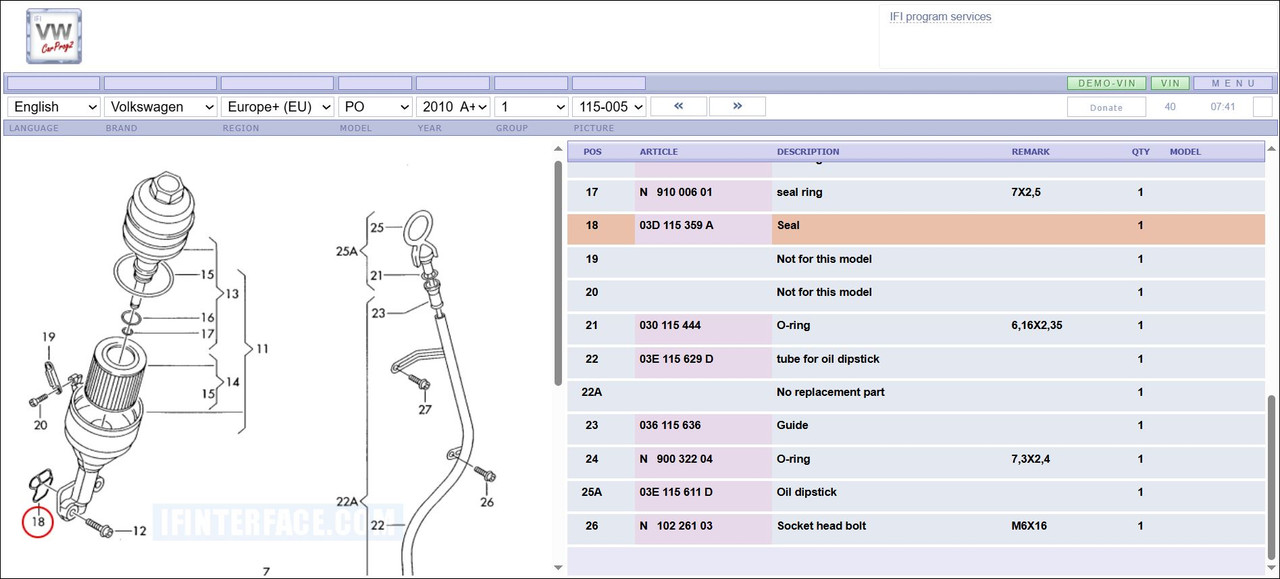
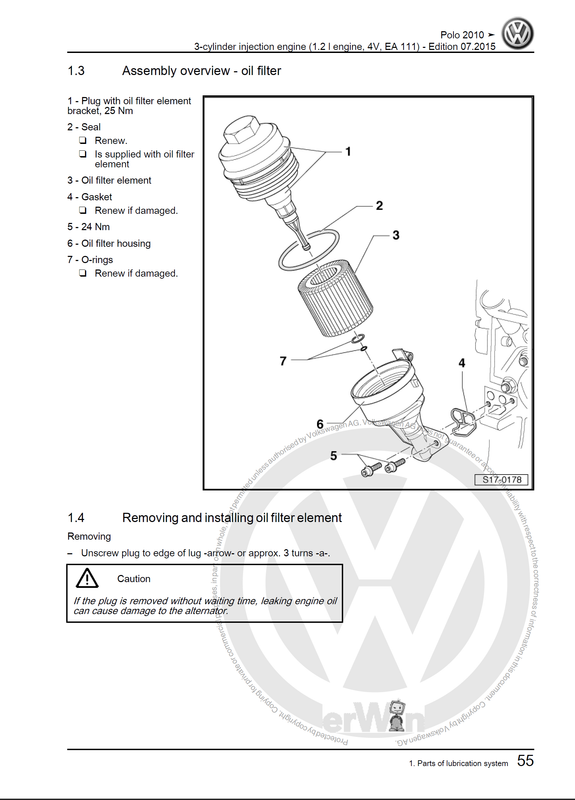
However when it starts to get up to temperature the oil filter housing leaks quite bad, replaced the gasket and attempted to replace it with a new housing but this one also has the same fitment issues.
Neither get close enough to seal and the leak remains, the filter housing as far as I can tell is correct and origional to the car.
It just hits the block and the timing cover, its not been off the car until the leak appeared now I can't seem to find a way to get it to fit back.
However when it starts to get up to temperature the oil filter housing leaks quite bad, replaced the gasket and attempted to replace it with a new housing but this one also has the same fitment issues.
Neither get close enough to seal and the leak remains, the filter housing as far as I can tell is correct and origional to the car.
It just hits the block and the timing cover, its not been off the car until the leak appeared now I can't seem to find a way to get it to fit back.
- Attachments
-
- 1.jpeg (280.35 KiB) Viewed 1879 times
-
- 2.jpeg (352.86 KiB) Viewed 1879 times
-
- 3.jpeg (411.87 KiB) Viewed 1879 times
-
- 4.jpeg (272.89 KiB) Viewed 1879 times
-
ciclo
- Bling Bling Diamond Member
- Posts: 9037
- Joined: Sun Feb 24, 2013 10:20 am
- Drives: 6R'13/G7.5'19
- Location: Earth ♥, Spain.
- Contact:
Re: Polo 1.2 6R CGP Engine rebuild
The issue isn't the oil filter housing itself (that's why the new one doesn't fit either). The cylinder head is physically colliding with the oil filter housing bell, preventing it from sitting flush against the engine block and causing the oil leak.
According to the VW factory manual for the 1.2 CGPA engine, the cylinder head must be lowered perfectly vertical onto its dowel pins (alignment guides). If the head shifted even a fraction of a millimeter during assembly, or if the front timing cover was tightened out of alignment, it invades the housing's space.
How to fix it:
1. Slacken the cylinder head / timing cover bolts: Slightly back off the bolts just enough to allow a tiny bit of movement and play between the head and the block.
2. Seat the oil filter housing first: While the head has some wiggle room, insert the oil filter housing and hand-tighten its bolts all the way in. This will mechanically force the cylinder head into its correct alignment relative to the housing.
3. Final torque sequence: Once the oil filter housing is flush and bolted down without any interference, re-torque the cylinder head bolts back to factory specs following the official sequence.
According to the VW factory manual for the 1.2 CGPA engine, the cylinder head must be lowered perfectly vertical onto its dowel pins (alignment guides). If the head shifted even a fraction of a millimeter during assembly, or if the front timing cover was tightened out of alignment, it invades the housing's space.
How to fix it:
1. Slacken the cylinder head / timing cover bolts: Slightly back off the bolts just enough to allow a tiny bit of movement and play between the head and the block.
2. Seat the oil filter housing first: While the head has some wiggle room, insert the oil filter housing and hand-tighten its bolts all the way in. This will mechanically force the cylinder head into its correct alignment relative to the housing.
3. Final torque sequence: Once the oil filter housing is flush and bolted down without any interference, re-torque the cylinder head bolts back to factory specs following the official sequence.
-
UKWaffles
- New
- Posts: 28
- Joined: Fri Sep 11, 2026 1:20 pm
- Drives: Polo 1.2 6R 2009
- Location: Portsmouth
Re: Polo 1.2 6R CGP Engine rebuild
Yikes, what horrible design.
The Housing was fully seated on the engine when the head went back on with its dowel pins. I have had to take it off since the old gasket was leaking and hard as rock after 110K miles.
I really don't want to have to disassemble the entire top end for a filter housing....seems a bit much
The Housing was fully seated on the engine when the head went back on with its dowel pins. I have had to take it off since the old gasket was leaking and hard as rock after 110K miles.
I really don't want to have to disassemble the entire top end for a filter housing....seems a bit much
-
ciclo
- Bling Bling Diamond Member
- Posts: 9037
- Joined: Sun Feb 24, 2013 10:20 am
- Drives: 6R'13/G7.5'19
- Location: Earth ♥, Spain.
- Contact:
Re: Polo 1.2 6R CGP Engine rebuild
Before you even think about disassembling the top end, try this:
1. Slightly slacken ONLY the 3 or 4 head bolts closest to the oil filter housing side (you don't need to remove them, just crack them open half a turn to relieve the clamping pressure).
2. Loosen the front timing chain cover bolts on that same side. This will give the head and cover just enough micro-flexibility (literally fractions of a millimeter) without breaking the head gasket seal.
3. Wiggle the oil filter housing in while pushing the head slightly away with a plastic pry tool if needed, and get the housing bolts started by hand.
4. Torque everything back down. Once the housing is bolted flush, re-torque those head bolts to their final spec.
It takes 10 minutes and saves you from a full teardown, give it a shot!
1. Slightly slacken ONLY the 3 or 4 head bolts closest to the oil filter housing side (you don't need to remove them, just crack them open half a turn to relieve the clamping pressure).
2. Loosen the front timing chain cover bolts on that same side. This will give the head and cover just enough micro-flexibility (literally fractions of a millimeter) without breaking the head gasket seal.
3. Wiggle the oil filter housing in while pushing the head slightly away with a plastic pry tool if needed, and get the housing bolts started by hand.
4. Torque everything back down. Once the housing is bolted flush, re-torque those head bolts to their final spec.
It takes 10 minutes and saves you from a full teardown, give it a shot!
-
UKWaffles
- New
- Posts: 28
- Joined: Fri Sep 11, 2026 1:20 pm
- Drives: Polo 1.2 6R 2009
- Location: Portsmouth
Re: Polo 1.2 6R CGP Engine rebuild
Well the engine's current state is its fully assembeled and was running when the leak appeared.
So I would still have to take the entire cam carrier off again, meaning a lot of work for a filter housing, I am more inclided to make a spacer to save off some of the housing
So I would still have to take the entire cam carrier off again, meaning a lot of work for a filter housing, I am more inclided to make a spacer to save off some of the housing
-
ciclo
- Bling Bling Diamond Member
- Posts: 9037
- Joined: Sun Feb 24, 2013 10:20 am
- Drives: 6R'13/G7.5'19
- Location: Earth ♥, Spain.
- Contact:
Re: Polo 1.2 6R CGP Engine rebuild
Fair enough! Once we get a fix in our heads, there’s no turning back.
Just don't "spoil the ship for a ha'porth of tar" after doing such a great job rebuilding that whole engine.
My main worry with the spacer route is that you'll be creating a "gasket sandwich" with multiple sealing surfaces. Under high oil pressure (4-5 bar on cold starts) and crazy heat cycles, having that many layers significantly increases the risk of a blowout. If a seal fails on the highway, the engine will dump its oil in seconds.
But hey, since you have that extra housing to play with, you have the perfect template to experiment. Just keep a very close eye on it during the first few drives to make sure it doesn't weep...

Just don't "spoil the ship for a ha'porth of tar" after doing such a great job rebuilding that whole engine.
My main worry with the spacer route is that you'll be creating a "gasket sandwich" with multiple sealing surfaces. Under high oil pressure (4-5 bar on cold starts) and crazy heat cycles, having that many layers significantly increases the risk of a blowout. If a seal fails on the highway, the engine will dump its oil in seconds.
But hey, since you have that extra housing to play with, you have the perfect template to experiment. Just keep a very close eye on it during the first few drives to make sure it doesn't weep...

-
UKWaffles
- New
- Posts: 28
- Joined: Fri Sep 11, 2026 1:20 pm
- Drives: Polo 1.2 6R 2009
- Location: Portsmouth
Re: Polo 1.2 6R CGP Engine rebuild
Yea, I am in 2 minds of the method to go for. Bar this it runs quite well, just need to get it up to temperature to make sure the radiator is fine as it looks like a war zone, loads of bent fins so I hope that is fine. Just this oil filter housing stopping me from doing so and getting it a MOT.ciclo wrote: Tue Oct 06, 2026 4:09 am Fair enough! Once we get a fix in our heads, there’s no turning back.
Just don't "spoil the ship for a ha'porth of tar" after doing such a great job rebuilding that whole engine.
My main worry with the spacer route is that you'll be creating a "gasket sandwich" with multiple sealing surfaces. Under high oil pressure (4-5 bar on cold starts) and crazy heat cycles, having that many layers significantly increases the risk of a blowout. If a seal fails on the highway, the engine will dump its oil in seconds.
But hey, since you have that extra housing to play with, you have the perfect template to experiment. Just keep a very close eye on it during the first few drives to make sure it doesn't weep...
Some digging required.
Thanks
-
ciclo
- Bling Bling Diamond Member
- Posts: 9037
- Joined: Sun Feb 24, 2013 10:20 am
- Drives: 6R'13/G7.5'19
- Location: Earth ♥, Spain.
- Contact:
Re: Polo 1.2 6R CGP Engine rebuild
It is possible—though unlikely—that the new gasket, due to its thickness and the fact that it is new, is preventing the filter housing from seating correctly. Hmm... try loosening the screws and guiding the housing into place again as best you can. Make a few attempts... 
Good luck!

Good luck!
-
UKWaffles
- New
- Posts: 28
- Joined: Fri Sep 11, 2026 1:20 pm
- Drives: Polo 1.2 6R 2009
- Location: Portsmouth
Re: Polo 1.2 6R CGP Engine rebuild
Well fixed the oil filter housing leak,
Now got a much smaller leak but it looks like its from between the head and block >_>
So looking like the head bolts are not tight enough or something I missed while building the top end.
Though it seems to slow down the longer the engine runs for so I assume oil pressure drops over time?
Guess you learn things with a 1st time rebuild.
Getting pretty good at getting these engines broken down now.
Now got a much smaller leak but it looks like its from between the head and block >_>
So looking like the head bolts are not tight enough or something I missed while building the top end.
Though it seems to slow down the longer the engine runs for so I assume oil pressure drops over time?
Guess you learn things with a 1st time rebuild.
Getting pretty good at getting these engines broken down now.
-
ciclo
- Bling Bling Diamond Member
- Posts: 9037
- Joined: Sun Feb 24, 2013 10:20 am
- Drives: 6R'13/G7.5'19
- Location: Earth ♥, Spain.
- Contact:
Re: Polo 1.2 6R CGP Engine rebuild


Since you've become an expert at stripping this engine down, the right move now is to back off the head bolts, let the head snap perfectly onto its dowel pins, and torque it down properly following the official factory sequence.
You're doing great for a first-time rebuild, keep it up!
-
UKWaffles
- New
- Posts: 28
- Joined: Fri Sep 11, 2026 1:20 pm
- Drives: Polo 1.2 6R 2009
- Location: Portsmouth
Re: Polo 1.2 6R CGP Engine rebuild
Yea, welp here we go again,
Need to order some more liquid gasket stuff for the timing cover and cam carrier.
Once I can get that in I can crack on and get the carrier off once more, I suspect the head bolt is not quite tight enough no other issues so far running it up sound decent and no other leaks do need to swap out the coolant at somepoint.
Need to order some more liquid gasket stuff for the timing cover and cam carrier.
Once I can get that in I can crack on and get the carrier off once more, I suspect the head bolt is not quite tight enough no other issues so far running it up sound decent and no other leaks do need to swap out the coolant at somepoint.
-
ciclo
- Bling Bling Diamond Member
- Posts: 9037
- Joined: Sun Feb 24, 2013 10:20 am
- Drives: 6R'13/G7.5'19
- Location: Earth ♥, Spain.
- Contact:
Re: Polo 1.2 6R CGP Engine rebuild
That’s the spirit! Practice makes perfect.
A quick reminder before you take everything apart:
If you end up loosening the cylinder head bolts, make sure to buy a new set. They are Torque-to-Yield (TTY) bolts and cannot be safely reused, otherwise, you might end up with the same leak all over again! It’s up to you.
Good luck with the rebuild, and keep it up!
A quick reminder before you take everything apart:
If you end up loosening the cylinder head bolts, make sure to buy a new set. They are Torque-to-Yield (TTY) bolts and cannot be safely reused, otherwise, you might end up with the same leak all over again! It’s up to you.
Good luck with the rebuild, and keep it up!
-
UKWaffles
- New
- Posts: 28
- Joined: Fri Sep 11, 2026 1:20 pm
- Drives: Polo 1.2 6R 2009
- Location: Portsmouth
Re: Polo 1.2 6R CGP Engine rebuild
Yea, I renewed them when I did the head gasket set and valves.
I am kind of hoping I can just tighten it a bit more I did mark them for the degree turn so I wonder if did quite do it enough. I might order a set just in case as its like £15
Spent like £60 on bolts from the dealer for the head / cams and the lot before as well >_< so many torque to yeild bolts
I am kind of hoping I can just tighten it a bit more I did mark them for the degree turn so I wonder if did quite do it enough. I might order a set just in case as its like £15
Spent like £60 on bolts from the dealer for the head / cams and the lot before as well >_< so many torque to yeild bolts
-
ciclo
- Bling Bling Diamond Member
- Posts: 9037
- Joined: Sun Feb 24, 2013 10:20 am
- Drives: 6R'13/G7.5'19
- Location: Earth ♥, Spain.
- Contact:
Re: Polo 1.2 6R CGP Engine rebuild
You are completely right to suspect the degrees. Here is a golden rule in engine building: friction lies.
Even if your paint marks aligned perfectly, things like the factory galvanized coating on new bolts, a tiny bit of leftover oil/debris in the block's bolt holes, or even the flex in your tools can create hidden resistance. You think you did the full turn, but a lot of that force was wasted overcoming friction instead of actually clamping the head down.
Since you already spent £60 on TTY bolts (they really love stretch bolts on these VAG engines!), try giving them a tiny extra nudge first.
Giving the bolts closest to the leak an extra 15 to 20-degree turn might just be enough to crush the gasket properly and save you from ordering new parts and tearing it down.
Give it a shot before you open the liquid gasket!
Even if your paint marks aligned perfectly, things like the factory galvanized coating on new bolts, a tiny bit of leftover oil/debris in the block's bolt holes, or even the flex in your tools can create hidden resistance. You think you did the full turn, but a lot of that force was wasted overcoming friction instead of actually clamping the head down.
Since you already spent £60 on TTY bolts (they really love stretch bolts on these VAG engines!), try giving them a tiny extra nudge first.
Giving the bolts closest to the leak an extra 15 to 20-degree turn might just be enough to crush the gasket properly and save you from ordering new parts and tearing it down.
Give it a shot before you open the liquid gasket!