Page 5 of 14
Re: Introducing my Lightning McQueen LM95
Posted: Tue Sep 24, 2019 11:53 am
by ag69
iichel, thank you very much for clarifying.
iichel wrote: Mon Sep 23, 2019 12:47 pm
The fuse 7, I think, is a terminal 58 and not a 58d. The d stands for dimmed. So they will always be at 100% brightness.
Originally the fuse SB7 should have been 5 amps, and not 15 according to my schemes.
This is a knowledge addition for me (again). Thank you.
I checked many people who have shared fuse box images as well as fuse box layout and details on multiple sites, however they differ. I was also surprised with 15A fuse.
iichel wrote: Mon Sep 23, 2019 12:47 pm
I'd advise to splice the wirings from i.e. ESP button for the illumination. But if you're happy this way, it's not wrong, not at all.
I was/am keen to have zero to least splicing so I used this method.
Re: Introducing my Lightning McQueen LM95
Posted: Tue Sep 24, 2019 12:16 pm
by ag69
6C Central Locking Switch
6C and some of 6R have many parts that have additional details. One example being this central locking switch on driver door.
Existing switch looks plane Jane and 6C one has brushed metal as well as edges.
Here is how they look side by side.
To change, you have to use the plastic trim removal to pull out door handle plastic trim. It is usual plastic clips lock mechanism.
No need to remove/loosen two screws.
Unplug the power connector.
Removing actual switch is bit tricky.
Access to one side of switch lets you remove two tabs that lets top part of switch which is a rocker get loose.
However there is no space to do same on other side. So use the plastic pry tools from top on inside/door side of switch gently.
Here is how it looks at daytime
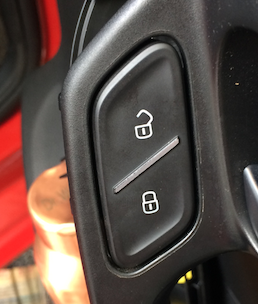
- Switch-Daytime.png (146.75 KiB) Viewed 7646 times
Here is how it looks once illuminated
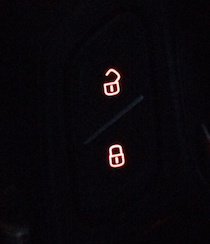
- Switch-Illuminated.png (83.17 KiB) Viewed 7646 times
Part Number -- 6C2962125B
Re: Introducing my Lightning McQueen LM95
Posted: Tue Sep 24, 2019 2:19 pm
by iichel
make sure just to replace the plastic cover. the electronics are slightly different.
Re: Introducing my Lightning McQueen LM95
Posted: Tue Oct 01, 2019 1:37 pm
by TheLizardKing
ag69 wrote: Fri Jun 16, 2017 10:14 am
Rear Tow Cover
Key hole protector
Hi,
Could you share the part numbers for these two items please?
Thanks in advance.
Re: Introducing my Lightning McQueen LM95
Posted: Mon Oct 07, 2019 8:00 am
by ag69
TheLizardKing, apologies for replying late. Was down with fever.
Rear Tow Cover -- 5JH 803 663 9B9
Key hole protector -- A2107660056 This is Mercedes Benz part.Though this looks good. But pre-prepared to see it fall off or get stolen

Re: Introducing my Lightning McQueen LM95
Posted: Mon Oct 07, 2019 10:56 am
by RUM4MO
ag69 wrote: Mon Sep 23, 2019 12:34 pm
Compartment at the passenger side.
This is quite straight forward, however it needs force to pull/push the plastic parts.
Here is how it looks after original panel is removed.
PassengerLowerPanel.JPG
Here is after it is replaced with one which has compartment
PassengerLowerHiddenPlan.JPG
Part Number is : 6R1863482 -- which is for LHD
On the UK market 6C Polo RHD, that compartment is fitted to the LHS as standard, on the UK market RHD SEAT Ibiza 6J 2009, that compartment is fitted on the RHS of the car and has part of the central section cut out, I guessed that that is so that you can use that area to store a HiVis vest for when you breakdown etc, having a hole cut in that door makes a lot of sense so that you remember what is behind there, I have stored a HiVis vest inside that area on my wife's 2015 6C Polo, but might consider cutting a hole in the door to remind people what is stored behind there, the RHS panel on the RHD Polo has the bonnet release handle, on the RHD SEAT Ibiza, the bonnet release is on the LHS, and it is also on the LHS or the 2019 RHD SEAT Leon Cupra, it seems that SEAT keep the bonnet release on the LHS regardless of if the car is RHD or LHS - I'm guessing that VW always keep it on the RHS or keep it on the side that the driver sits at.
Re: Introducing my Lightning McQueen LM95
Posted: Fri Nov 08, 2019 2:49 pm
by ag69
RUM4MO wrote: Mon Oct 07, 2019 10:56 am
On the UK market 6C Polo RHD, that compartment is fitted to the LHS as standard, on the UK market RHD SEAT Ibiza 6J 2009, that compartment is fitted on the RHS of the car and has part of the central section cut out, I guessed that that is so that you can use that area to store a HiVis vest for when you breakdown etc, having a hole cut in that door makes a lot of sense so that you remember what is behind there, I have stored a HiVis vest inside that area on my wife's 2015 6C Polo, but might consider cutting a hole in the door to remind people what is stored behind there, the RHS panel on the RHD Polo has the bonnet release handle, on the RHD SEAT Ibiza, the bonnet release is on the LHS, and it is also on the LHS or the 2019 RHD SEAT Leon Cupra, it seems that SEAT keep the bonnet release on the LHS regardless of if the car is RHD or LHS - I'm guessing that VW always keep it on the RHS or keep it on the side that the driver sits at.
RUM4MO, quite interesting.

Re: Introducing my Lightning McQueen LM95
Posted: Fri Nov 08, 2019 3:05 pm
by ag69
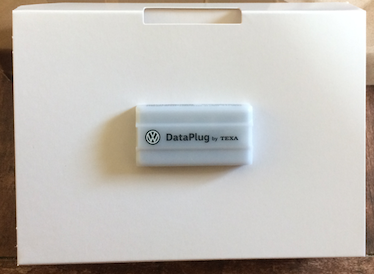
VW Connect Data Plug 5GV051629L
This was out of curiosity of "what does VW Data Plug would show?" (when you have VCDS

) I bid and bought a data plug.
Ebay seller was selling 5GV051629J but surprisingly I got 5GV051629L.
Still I am not sure if I was/am fooled. But think L > J this is newer version I am keeping a smiling face

After plugging it in, got it working.
iPhone App - "We Connect Go" needs you to select "Service Partner" as part of application configuration.
Also you need to create an account and give consent to use Basic Profile, email, address and phone number.
Addition to bluetooth, mobile data or wifi, location should be on to get all things working.
Here are some pictures :
Neat Packaging from eBay seller
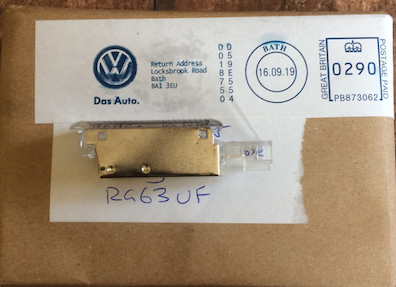
- Neat-Packing.png (209.46 KiB) Viewed 7160 times
Front of Box
Rear of Box
Actual Plug
- Plug.png (152.23 KiB) Viewed 7160 times
3 feet long/wide multilingual manual
A document for entire process :
https://drive.google.com/file/d/19LM39p ... w?ths=true
Re: Introducing my Lightning McQueen LM95
Posted: Mon Nov 11, 2019 7:01 am
by ag69
ag69 wrote: Mon Sep 23, 2019 12:19 pm
Very honestly illuminates images (shared here) does not do justice. The color looks orange here where are in reality they are Red. To match rest of interior.
Assume this is more towards red
Clicked with digital camera with forced flash off
Re: Introducing my Lightning McQueen LM95
Posted: Mon Nov 11, 2019 7:02 am
by ag69
ag69 wrote: Tue Sep 24, 2019 12:16 pm
6C Central Locking Switch
This is again from a digital camera.
Re: Introducing my Lightning McQueen LM95
Posted: Tue Nov 12, 2019 4:20 pm
by Aquavalver
ag69 wrote: Fri Jun 16, 2017 10:14 am
Here are list of Modifications/Beautification that I have done:


Hi! Some nice subtle mods that you've done!
Could you please tell me the part number for the seat rail caps? As I think it looks a bit unfinished without them!
Re: Introducing my Lightning McQueen LM95
Posted: Tue Nov 12, 2019 4:34 pm
by ag69
5J7-881-477
Re: Introducing my Lightning McQueen LM95
Posted: Tue Nov 12, 2019 4:36 pm
by Aquavalver
ag69 wrote: Tue Nov 12, 2019 4:34 pm5J7-881-477
Thank you very much!
Re: Introducing my Lightning McQueen LM95
Posted: Wed Nov 13, 2019 1:18 pm
by ag69
(Need Guidance) Rear Passenger, Boot and Glove box Light
My car has company fitted front foot well. They are under dashboard for driver and passenger. They are 7L0947415 which has 5W5 bulb.
Dome light (6Q0947105M) which has a single 10W bulb.
As i am bit fan of male female connectors and or have less guts to splice cables. I have made one so i can run these additional lights for rear passengers, boot and glovebox.
There are 5 numbers of 7L0947415 which i have procured.
Expected to behave same as existing lights ie light up on door open.
10W (dome) + 2x 5W (footwell) = 20 W is current total consumption
If i add additional 2 footwell, 2 boot and 1 Glovebox then consumption would be 45W odd -- recipe for blow fuse.
SO i have three questions here --
can i take current from some other location/s instead of existing footwell so we can save the blowing of fuse? -- directly from dome?
Replacing all bulbs with LED so power consumed would be less than total consumption (but i am not getting warm white LED). These one have very less power consumption -- Osram Retrofit 2780CW-02B0 LED Bulb (12V, 0.5W)
And how should i route cables?
-- under transmission tunnel for rear footwell?
-- along other cables for trunk?
In future i would like to do something like benzinkopf (and/or projection logo) --
viewtopic.php?f=56&t=69026&start=450#p560258
@ciclo, on 1st page of your RosaLine --
http://www.uk-polos.net/viewtopic.php?f ... 45#p468886
there is already one trunk light, so am not sure if this would be applicable to me.
Re: Introducing my Lightning McQueen LM95
Posted: Wed Nov 13, 2019 2:16 pm
by benzinkopf
Hurm. I’m not really good at this power consumption calculation either. But i do feel like I’ve put too many lights now. so here’re my current setup:
1. all interior original bulb changed to leds
2. all four footwells i still uses bulb.(I route the wire to the rear footwell via left/right side floor to under front seat)
3. bootlight still bulb. couldnt find any led that will totally shut off there.
4. all door exit lights including boot are LEDs and powered by +30 my rvc camera power.
All 1 to 3 is using the same power line(means interior lighting from BCM)
i plan to connect another led to the bcm interior power for side mirrors puddle light. let see how it goes.
Sent from my iPhone using Tapatalk