Yes, that was the video that tipped me off to the noise being of more concern than I originally thought.
I did the job last weekend and have been driving for a week and so far so good. I still get the rattling occasionally after cold start but not as frequently so when I eventually get the timing chains done I'll have them look to see if the screen filters in the cam phaser bridge are still there. I couldn't see any remnants down each of the cams so hopefully they're still there.
Now onto the job itself...
TLDR: Febi 182093 fits Rev D and G spool valves. Due to the lack of space in the polo engine bay, the exhaust cam is a pig to do. Test everything before you fit it, just because it's new doesn't mean it works. If the spool valve moves and returns, the screen filter within it is still intact and not gummed up and the spool valve itself is intact it probably doesn't need changing. After the job, my low-end torque is back 1800-2200 RPM is no longer dead, throttle response seems to be improved and my MPG is back

.
The first point to make which is very important.
The vast majority of torque wrenches are not bidirectional. Even though they have a ratchet where you can change the direction they will only function as a torque wrench when tightening (turning clockwise). Luckily the thought came into my head while trying to get the new spool valve to torque up and I thought this is a lot of force for 35nm. Tried "35nm" on a lug nut and it broke loose before clicking

A snapped spool valve or a stripped thread in the cam won't be fun or cheap.
Luckily the Teng torque wrench I was using the ratchet face was the same size front and back, so I took it out and flipped it around, hey presto I now had a torque wrench that could do reverse threads

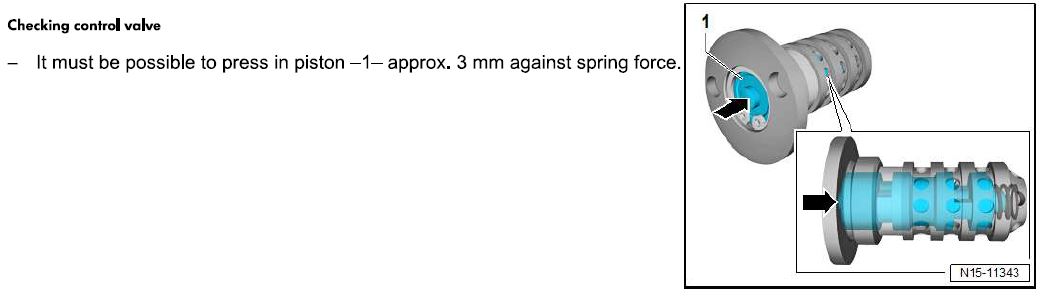
Also, test your new parts. You can test the solenoids by plugging them in and resting them on the engine. Then use your diagnostic tool of choice and run an output test on each of the solenoids. You should see them retract and extend freely. To check the spool valves, push on the valve with a small screwdriver and ensure it pushes in smoothly and returns.
Back to starting the job.
I put my car in 6th so I couldn't turn the engine over just in case.
The solenoids that actuate the valves are held in with 3 T30s, start with the intake solenoid as removing it gives more access to the one on the exhaust cam.
Removal is simple enough, disconnect the wiring, undo 3 T30s and prise the solenoid out. Space is very limited so I had to use a 1/4" ratchet. The solenoids also push into an o-ring in the cam bridge, I had all my upper timing cover seals replaced within the last few months after 2 of them blew out due to a faulty PCV so I didn't replace them. However, they're only a couple of quid so worth changing if they've not been done. Part number WHT007212B. If they're leaking you'll get an oily residue around the solenoid and or the bolts that hold them in.
To prise it off I just used two small flatheads to work it off enough until I could grip it with my hand and then pulled it straight back. Just be wary of the cam phaser bridge to upper timing covers seals if you're sticking something in to get them started. There will be some oil behind these so shove some paper towel or a rag down between the engine mount bracket and upper timing cover.
I can't really give a solid method to get the bolts out of the exhaust cam solenoids as the aircon lines, fuel feed, and fuel tank vent lines are just in the way no matter what you do. Just do what you find works for you. I ended up with the same 1/4" ratchet with 2 small extensions with a flexi joint in the middle which I had going in between the airocn lines to get to the bolt at the back.
With the solenoids off, they were both still sticking when fully retracted but would then move with a little resistance.
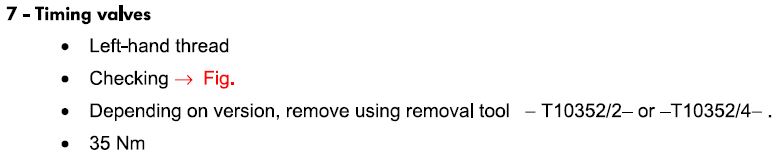
Now for the spool valve. For rev D and G it seems the correct socket is T10352/4 and I guess rev F is T10352/2.

- Spool valve removal.JPG (39.95 KiB) Viewed 6194 times
I'm not sure if it was the sockets I bought but all it wants to do is jump out of the holes on the valve. So use your left hand to apply a decent amount of force pushing the socket into the valve to keep it seated. They take some effort to break loose but once they are it's a very fine thread so can undo it by hand from that point. Once loose, they won't just fall out you'll need to get a pick or something of the sort behind the shoulder just to pull it out so you can then use your hand to get it out the rest of the way. There is more oil behind the valve so make sure the rag is still there from when you removed the solenoid.
Now for re-assembly.
I can't stress this enough.
Ensure that your torque wrench actually works turning anti-clockwise. I soaked the end of the valves with some engine oil but not the threads before putting them back in. Do the intake valve first as it's the easiest to do and allows you to get a feel for what to do. Once the intake cam valve is in don't put the solenoid back yet as you'll need the extra access again for the exhaust solenoid.
- Timing valve torque.JPG (21.58 KiB) Viewed 6194 times
Once the valves are back in, clean up the engine oil that's pooled up and use it to moisten the O-rings for the solenoids. Put some on the outer ring of the solenoid itself as well as it makes pushing the solenoid into the o-ring much easier.
When pushing the solenoid back in make sure to push it in straight and evenly. With the o-ring and outer surface oiled, they push in very easily. Line up the holes on the cam bridge and solenoid as best as you can.
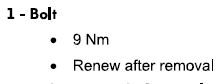
Once in, partially put 2 of the bolts in to line up the final hole then tighten them all up evenly. Now the torque spec is only 9nm but there is an oil seal in there so you want even pressure. I had a torque wrench that could go down to 9nm so I used it.
- Solenoid bolts.JPG (10.17 KiB) Viewed 6194 times
Now plug the solenoids back in and ensure the tabs on the connectors are pushed back into their locked position.
First start
Now I may have been gone a little OTT but I didn't want to chance anything going wrong so I disconnected the coil packs and cranked the engine over for a good 15-20 seconds to get a decent amount of oil pressure up to the cams.
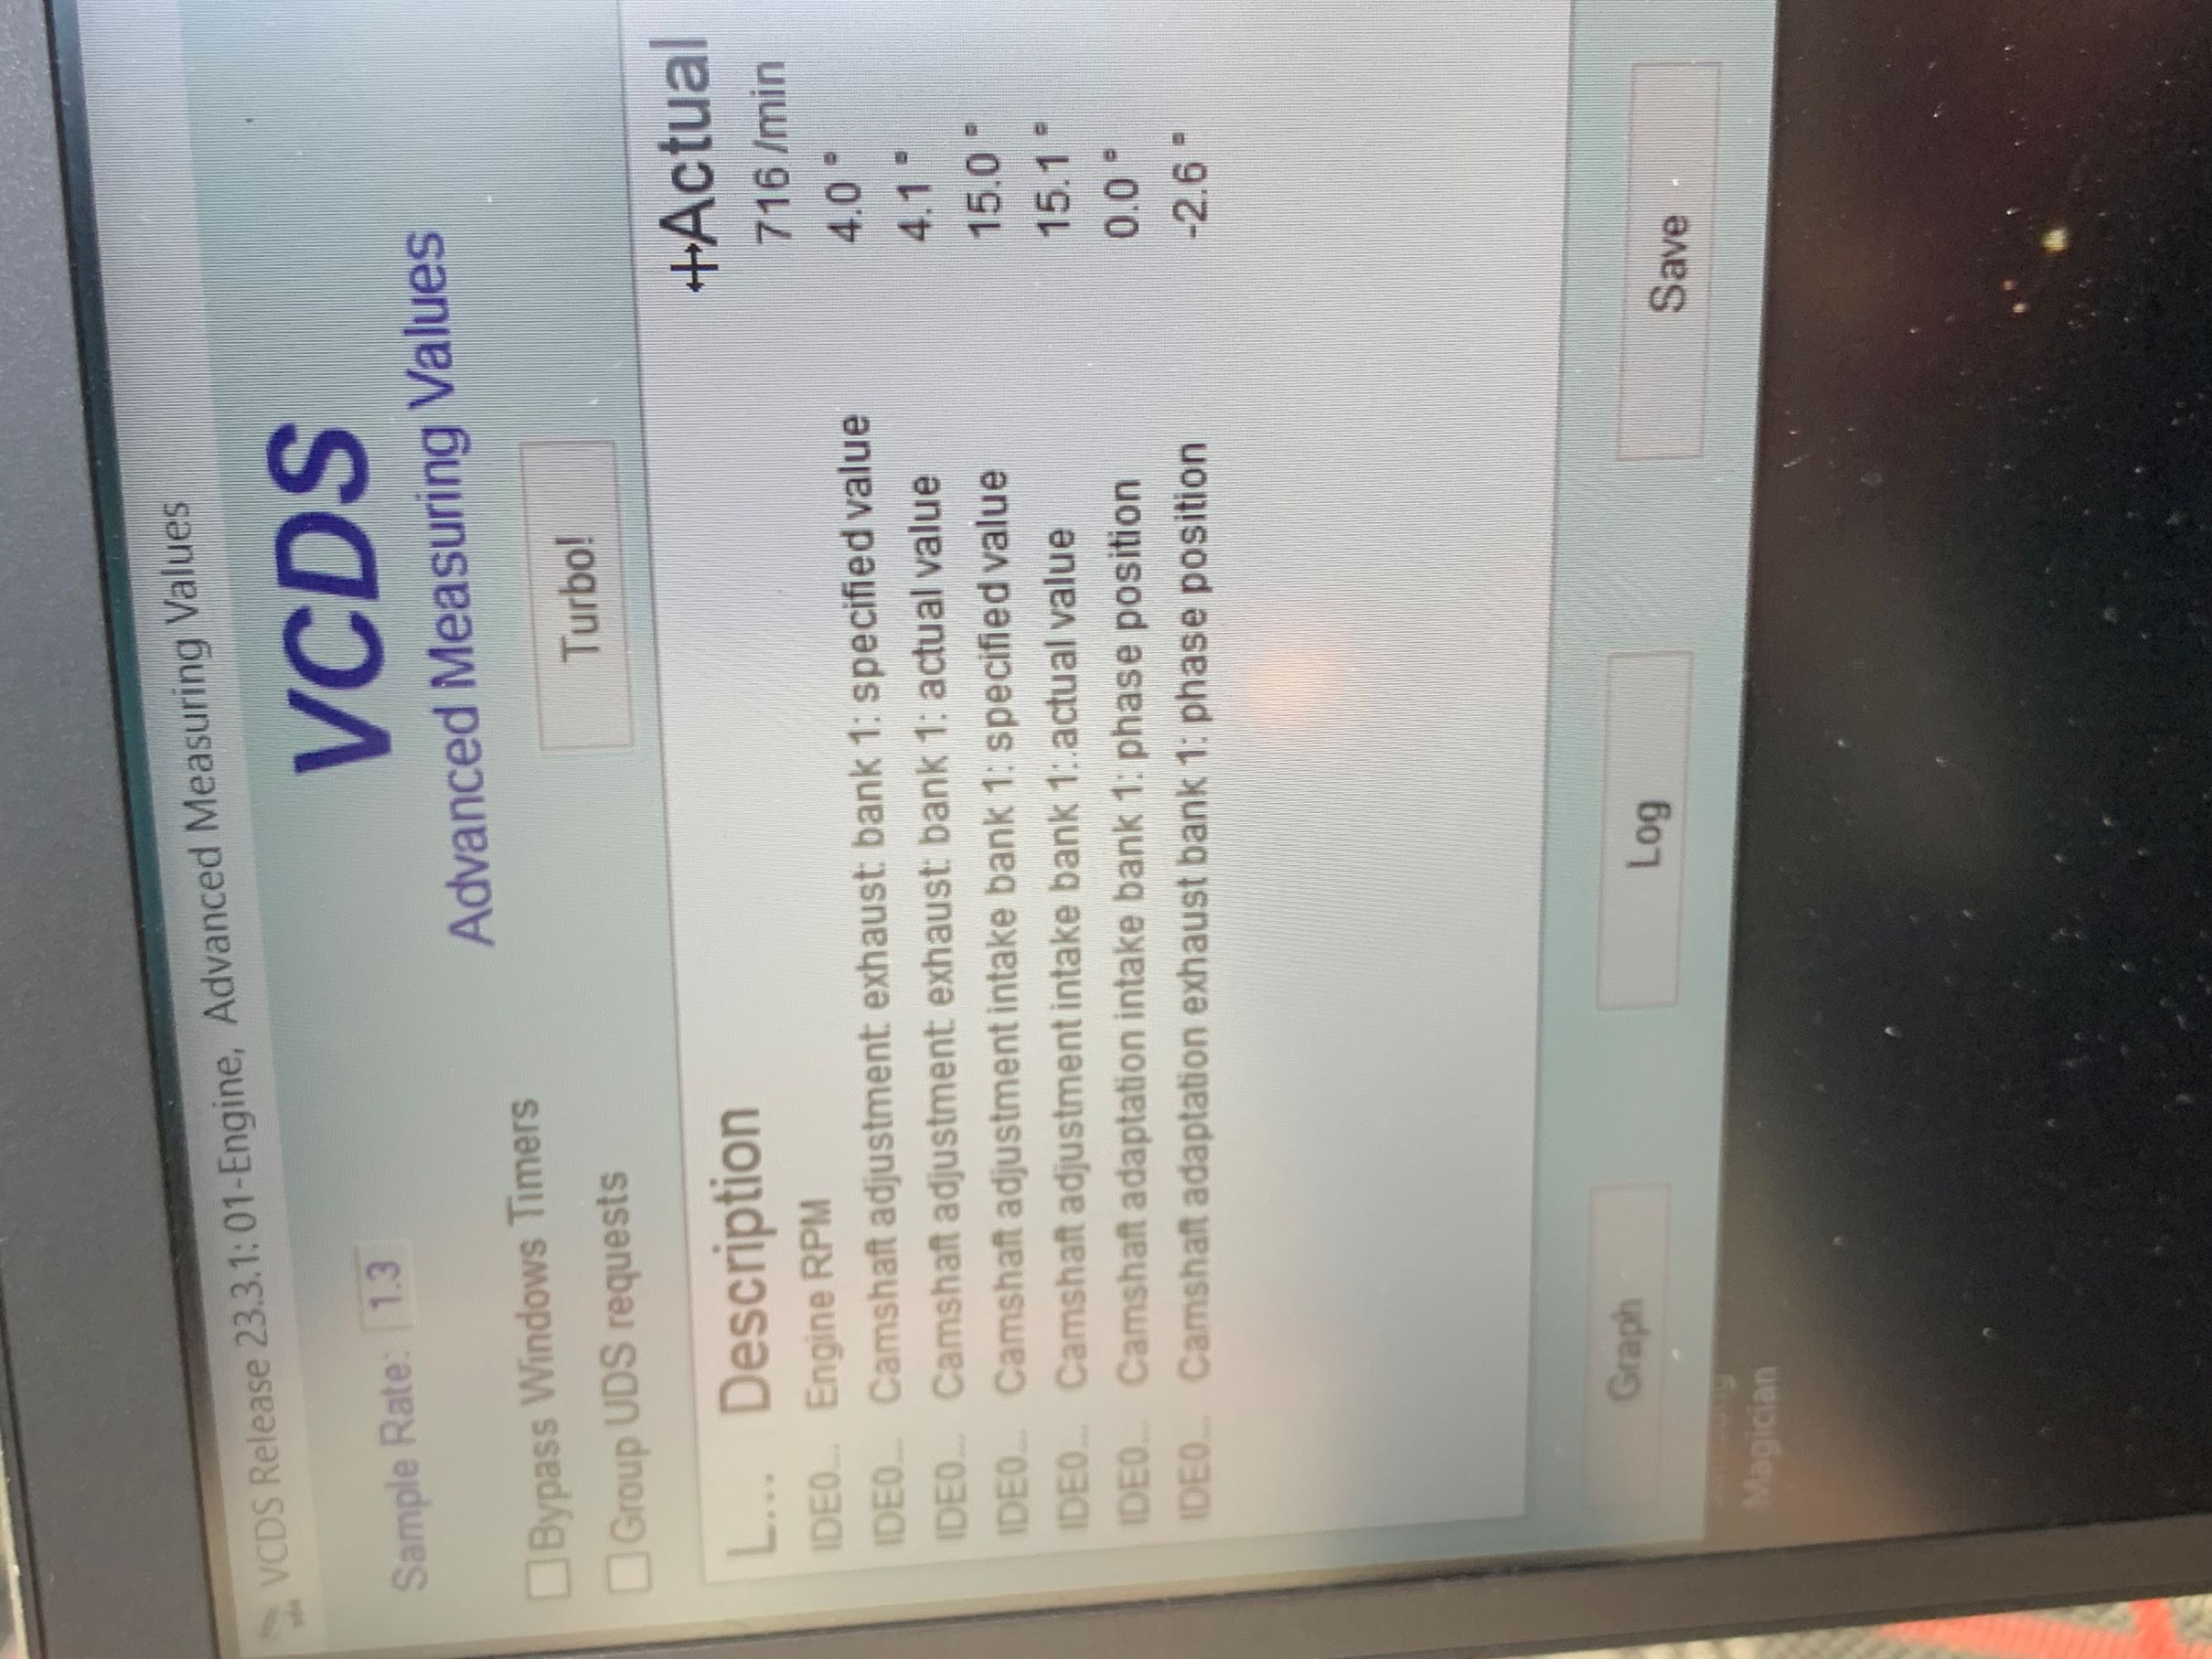
Now for the first start, I connected up my VCDS to monitor the camshaft adjustment. All was well on cold start, exhaust specified advanced 30°exhaust actual 30° rock solid, intake specified and actual 0°. Then when cold start ended the car started shaking pretty badly. Exhaust specified and actual 4°, intake specified 15° actual 0°

I decided to try running the intake and exhaust camshaft adjustment valve basic setting. Exhaust passed, intake failed and set a P0011, Retard set point not Reached (Over Advanced). Once that code is set the ECU seems to no longer try to control the valves as both specified values went to 0°.
Failed basic setting

- Failed Basic Setting e.jpg (432.24 KiB) Viewed 6194 times
Logged P0011 fault
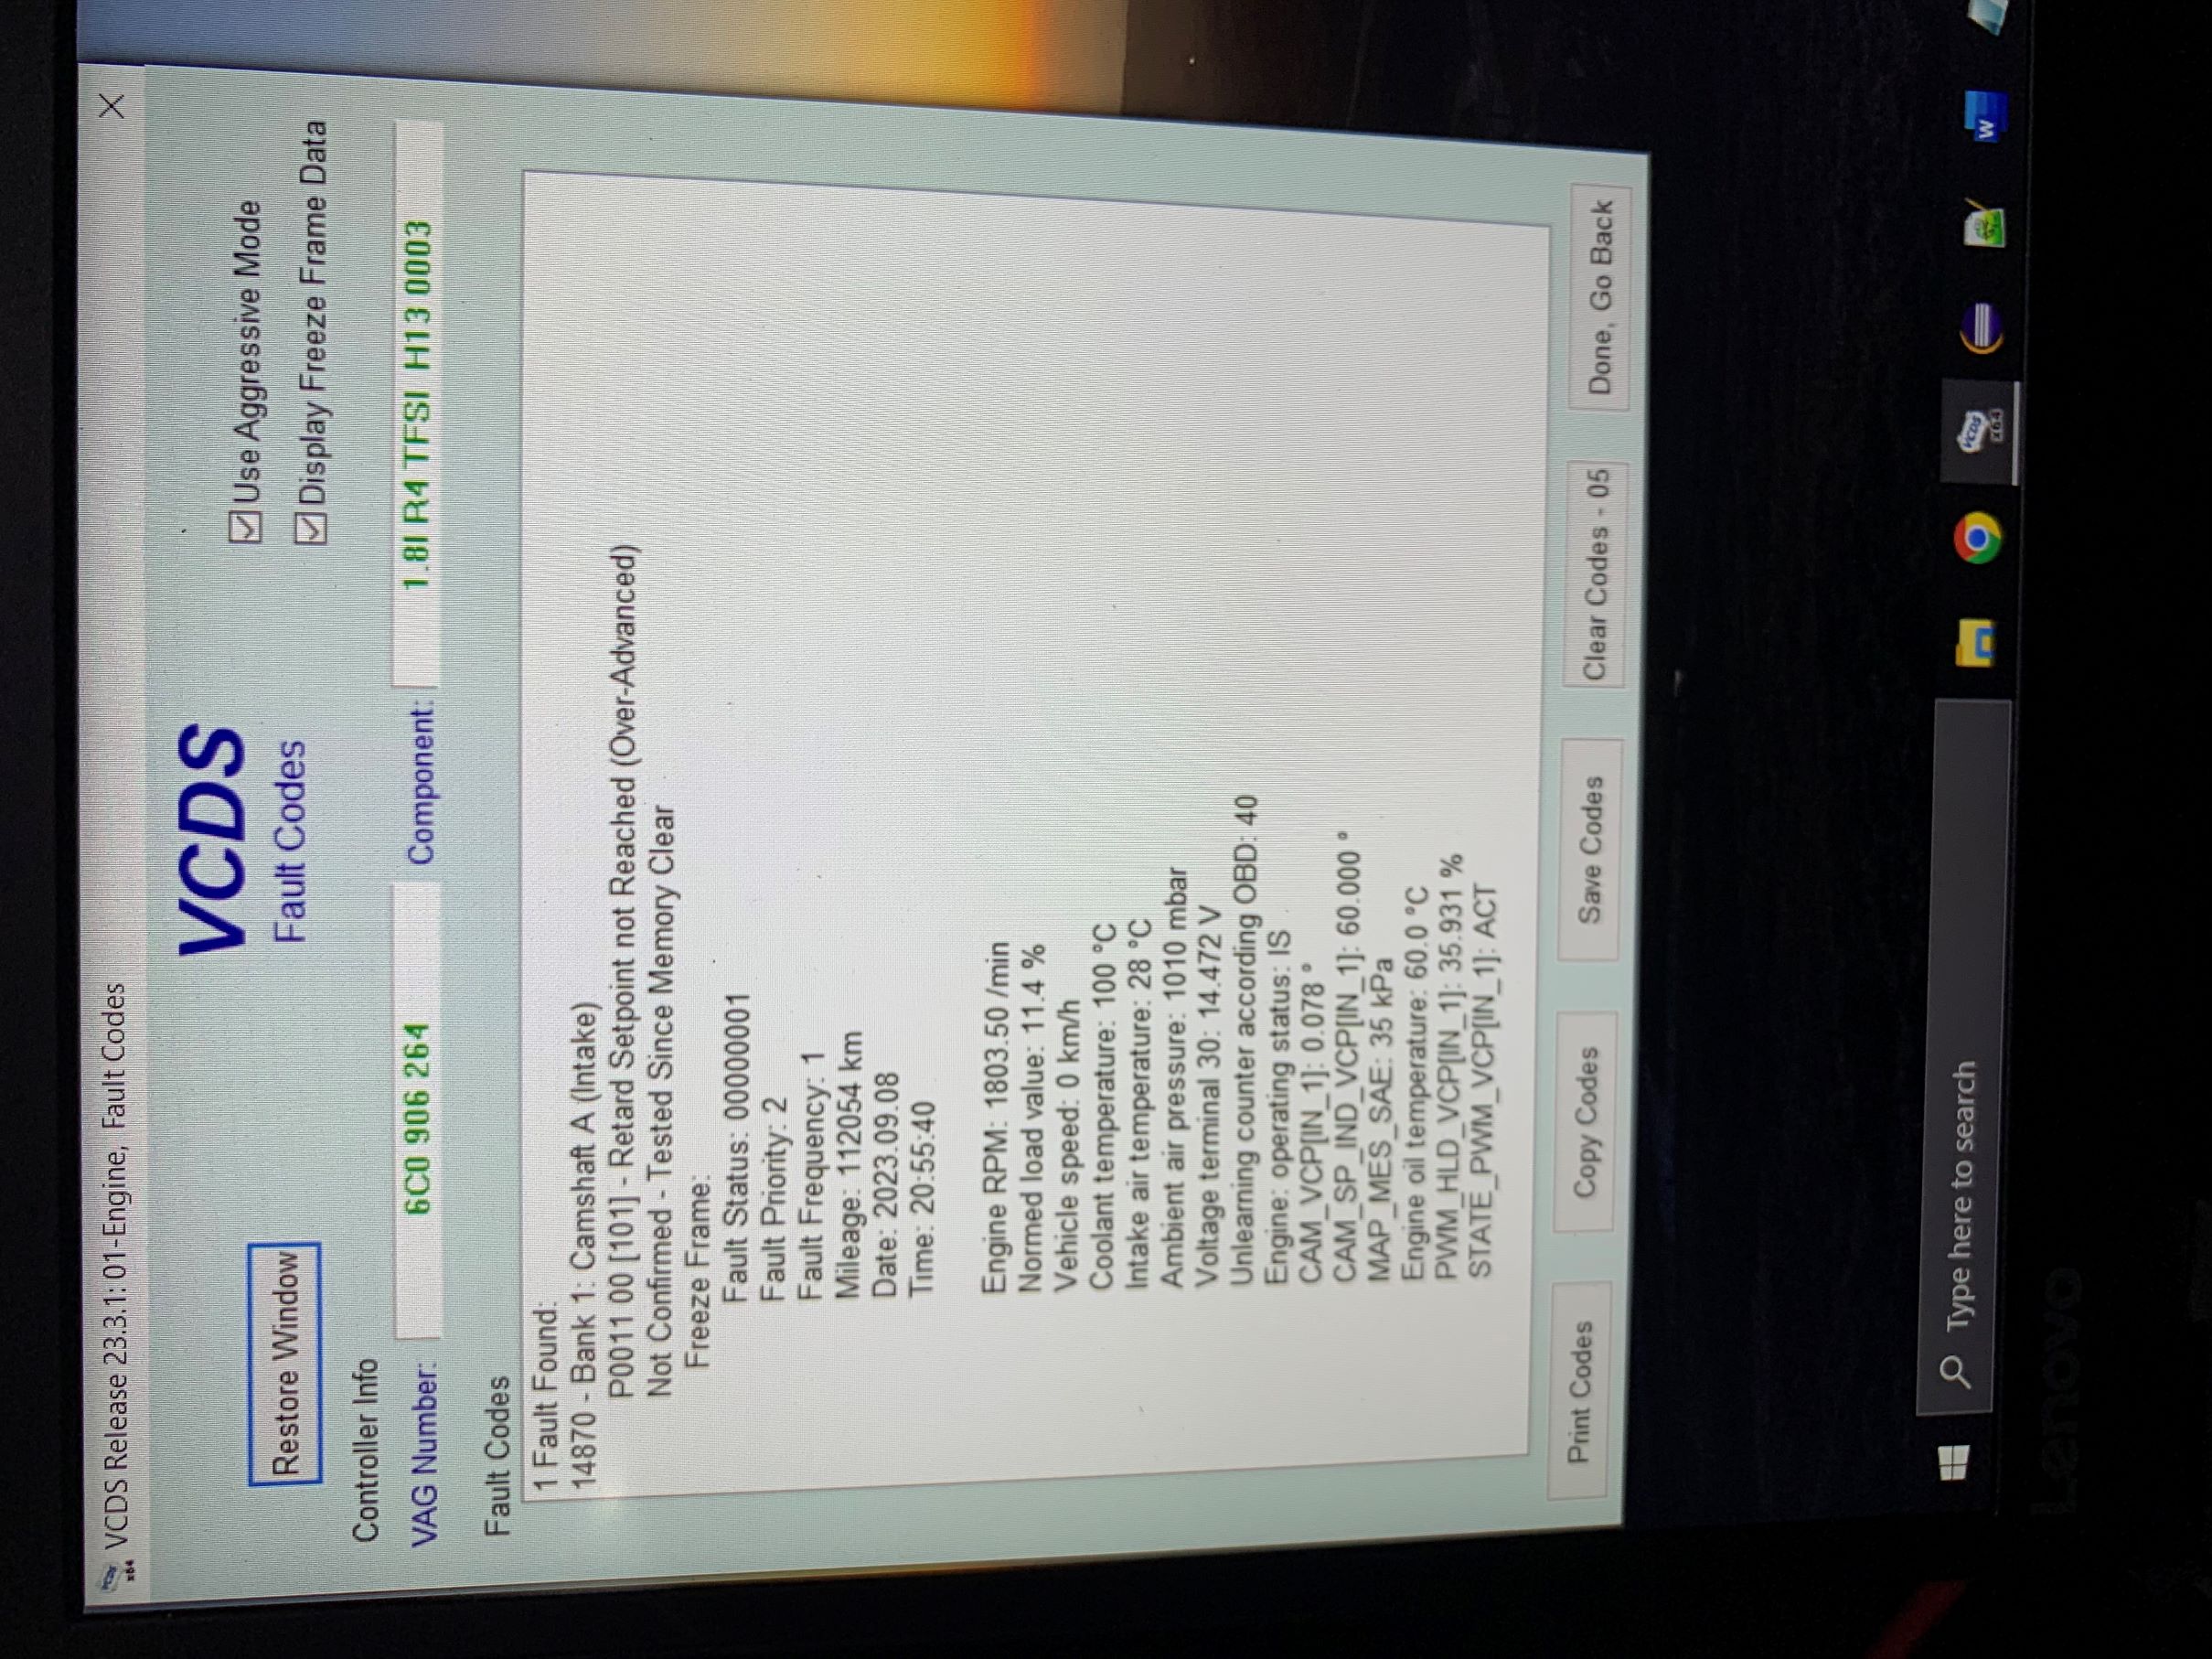
- Fault e.jpg (653.57 KiB) Viewed 6194 times
Intake cam not adjusting
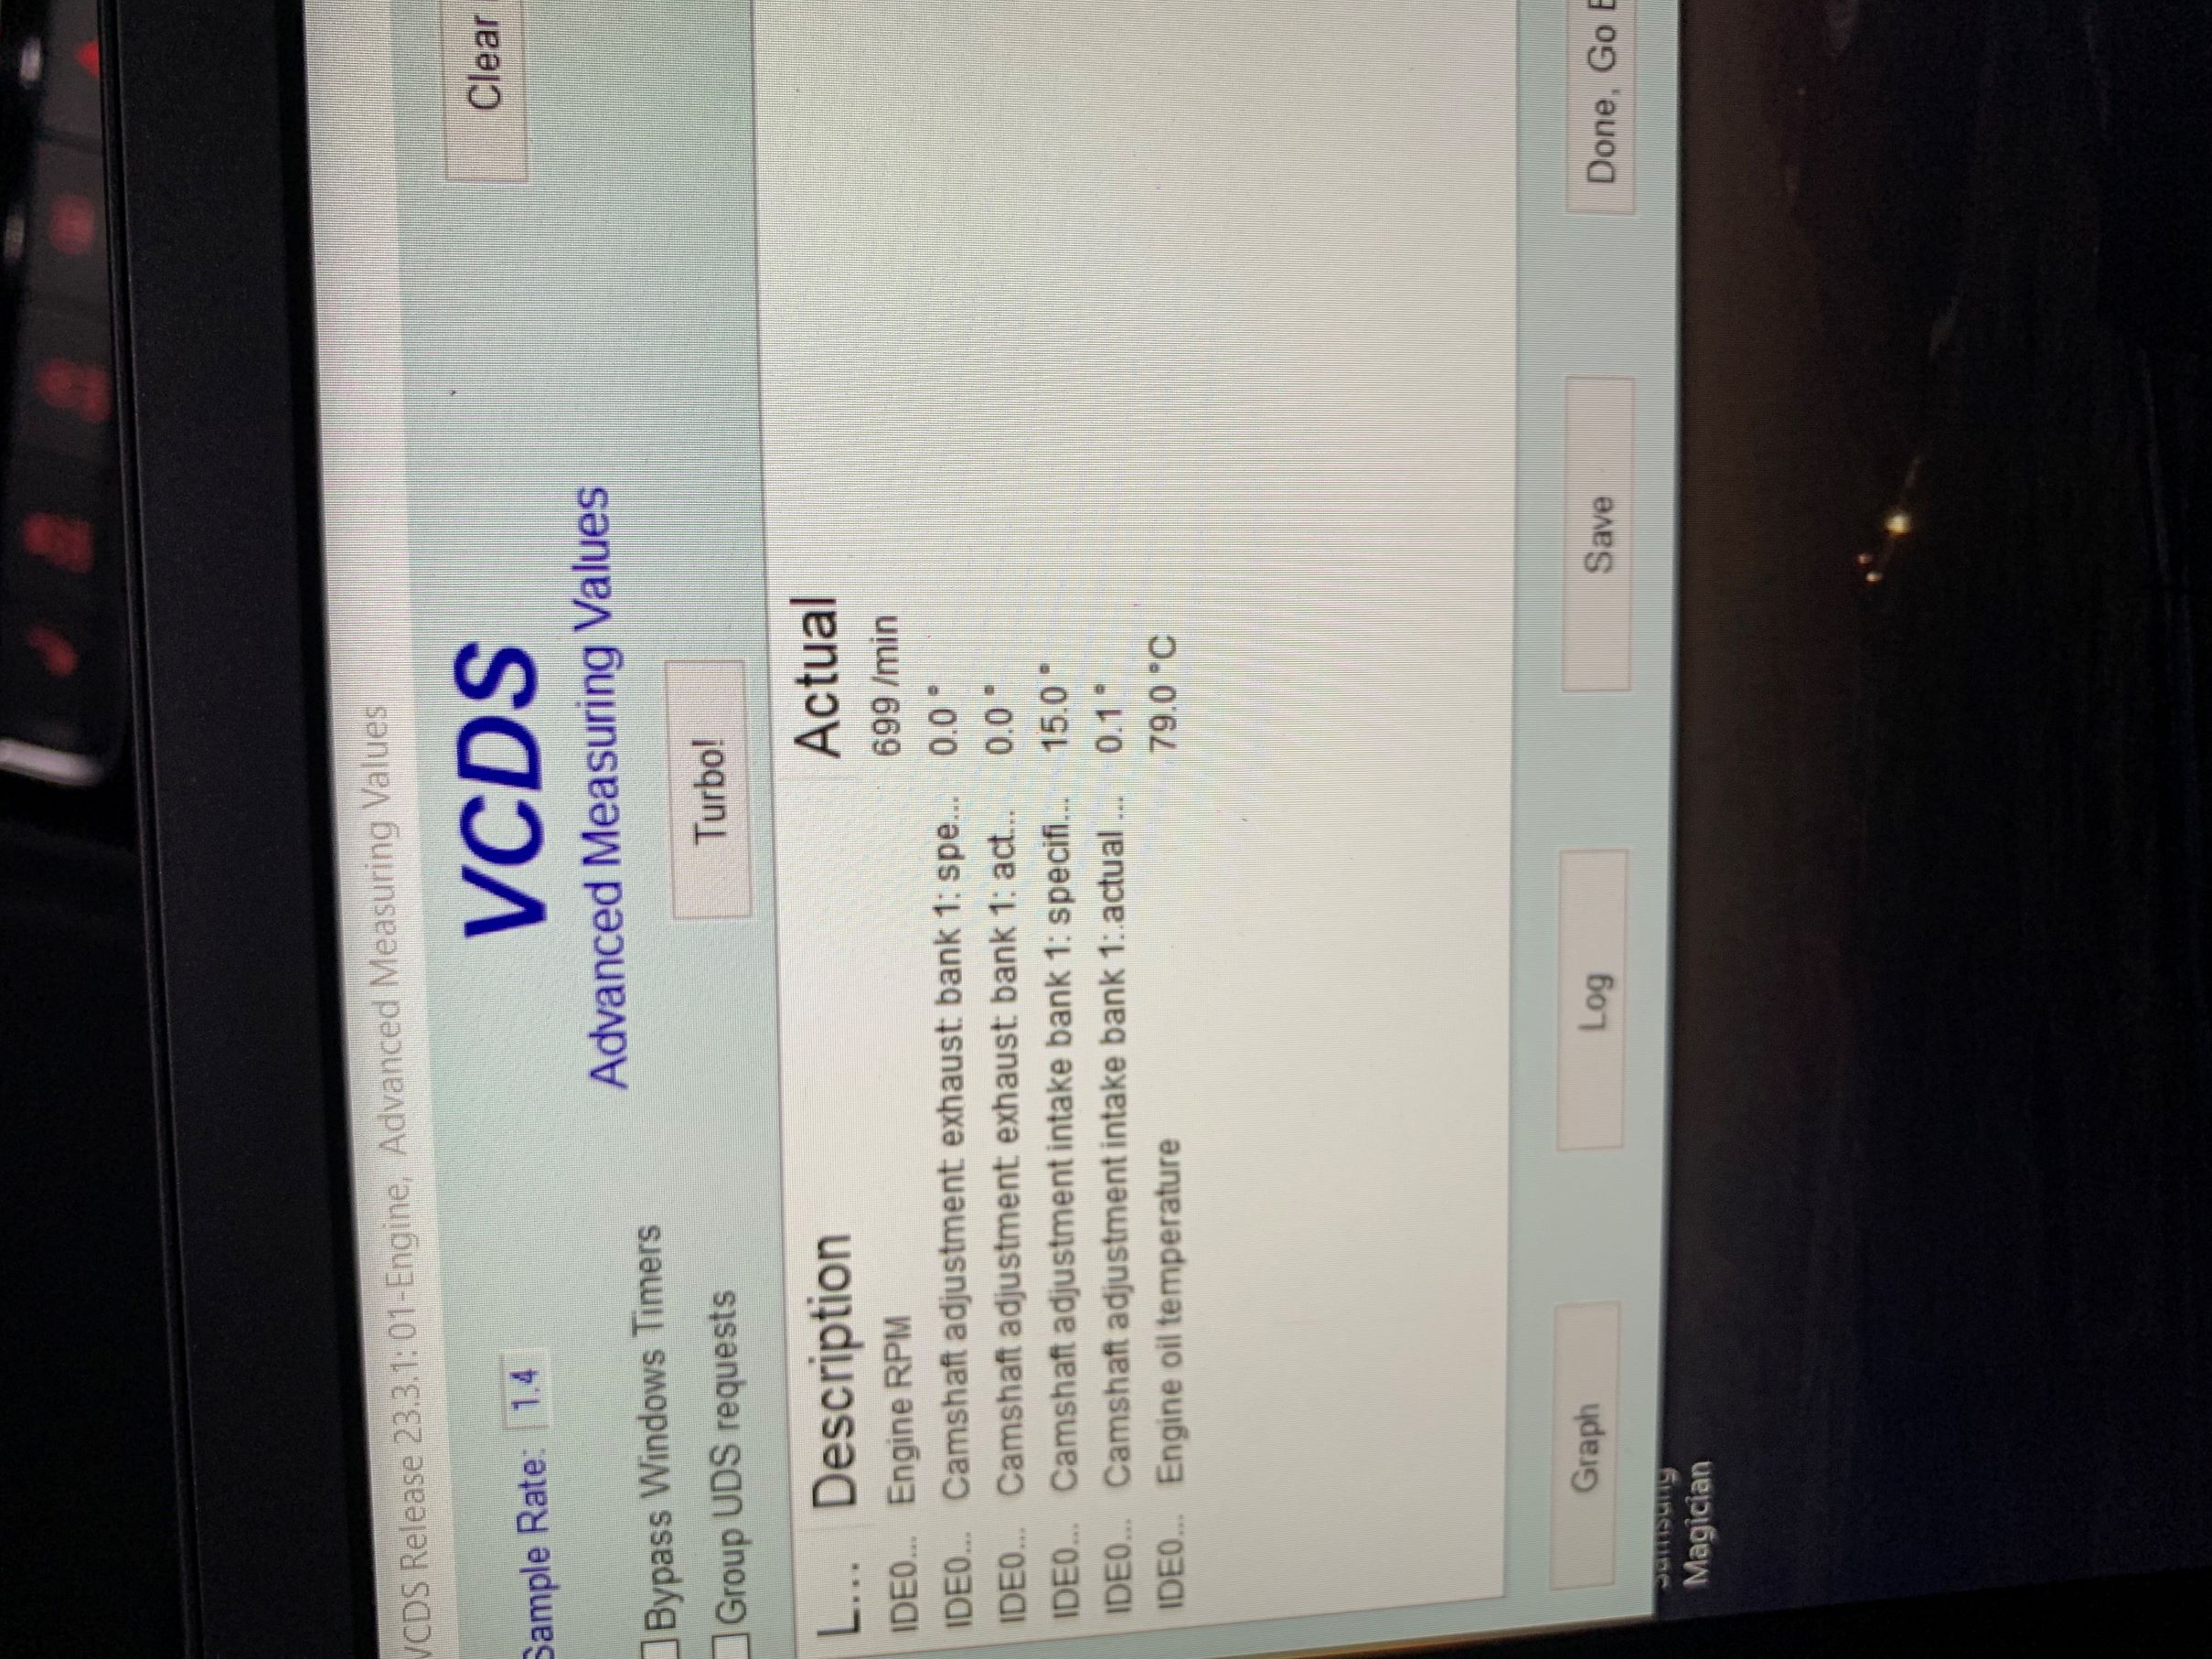
- Dodgy valve e.jpg (636.22 KiB) Viewed 6194 times
Diagnosis
Luckily the fault was on the intake cam so the easiest of the two to work on.
I started with doing an output test of the solenoids as there was no movement at all so assumed the new intake solenoid to be dead. Exhaust solenoid had a rhythmic clicking, intake had nothing. To confirm it wasn't a wiring fault I plugged an old solenoid into the intake harness and let it rest on top of the engine cover and ran the test again. The old solenoid moved so not a wiring fault.
I removed the intake solenoid and confirmed it was moving, ran the output test and the new solenoid moved freely. So confused I decided just to push on the spool valve with a screwdriver and it was stuck solid. No movement whatsoever. Removed the valve and there wasn't anything obviously wrong with it but it didn't move at all. So put the old valve back in after cleaning it up a bit, confirmed it moved and returned after torquing it up so re assenmbled and tried again.
- Timing valve check.JPG (35.71 KiB) Viewed 6194 times
First start take 2
As the old valve was still somewhat primed with oil I didn't bother building oil pressure before starting this time. The start was much smoother and no shaking. I still watched the live data, cold start was still rock solid 30° on the exhaust, once cold start finished the intake specified and actual was 15° and rock solid.
Let the engine warm up for a bit and ran both intake and exhaust basic settings, both of which passed first time
Working valves
- Good valve e.jpg (516.77 KiB) Viewed 6194 times
Outcome
End of cold start rattle is less frequent, so now suspect an issue somewhere else in the timing circuit. Exhaust phaser is compensating 2.6-3° so chain stretch limit is close being +-5°. Adjustment values are rock-solid so don't suspect the oil is bypassing the seals in the phaser but is rather an initial oil supply issue when the phasers unlock.
Engine revs more freely when in neutral.
Low-end torque is back, 1800-2200 RPM is no longer a dead zone.
Throttle response is mildly improved.
MPG is back up to the mid 40s when cruising at motorway speeds. For that past year, I had to try very hard to get over 40mpg now I can set cruise control at 74mph and get 44mpg plus without trying. A few times have neared 50mpg when in average 50 limits or heavy traffic averaging 50-60mph.
It seems that my fault was mainly caused by the sticking solenoids unless the old valve in the intake cam is the cause of the ticking after cold start. Will update when the replacement arrives and is fitted.
Overall happy with the outcome but what looked like a straightforward job was a right pain in the backside doing it for the first time.
Hopefully, that encyclopedia amount of text and the rest of the thread was of use to you

