Respray half complete - Its white!

Detailing & Bodywork
vdubit
Gold Member
Posts: 619
Joined: Sun May 22, 2005 12:53 pm
Location: Exmouth, Devon
Contact:

Respray half complete - Its white!

Post by vdubit »

Ok, so as many of you have already read, the polo's set to undergo another respray. This is mainly due to me be bored with the plain old grey colour its currently sprayed in.

When I did the car last time round I was in a bit of a hurry, and as a result never really finished it. Rather than finish the bits that need doing and retain the grey, i thought it made sense to change the colour to one I like.

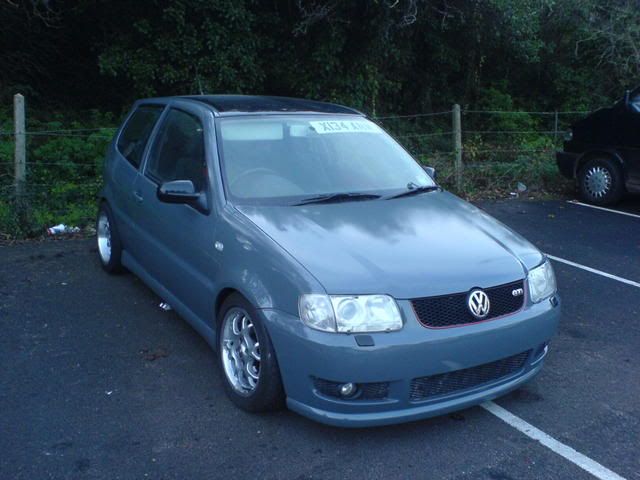
So, just a recap, or for those who have yet to have seen it, here's the before, after and pre-done photoshop.

Image

Image

Image

I have a few minor niggles to do before i can spray it. Firstly, the arches are being pulled at the rear around an inch each. This unfortunatly goes against my beliefs of using proffesional help. The cars booked in at the end of the month to have this done. I don't mind trying most things myself, but i really dont wanna cock this one up!

The skirts then need end caps put on them. They were too long for the car, so i cut them and never sorted them properly.

There's a dent on the rear quarter and on a front wing, from where i've leaned on the car to lift it to allow a jack to go under it. These will also be filled.

Unfortunately my home-smoothed front bumper is loosing its looks, the filler on it has began to lift and looks very bizarre! I will be digging out all the previous work and plastic welding it up properly. Should looks tons better.

Thats about it really. All the shuts will be sprayed this time (unlike last time) as will the underside of the bonnet and the insides of the doors/boot. I have some time off at the end of the month, where all the work should be complete minus the spraying, which should hopefully take place at the beginning of next month (once i've started my new job so i can drive my new company car around).

Will update as i go!

Andy
Last edited by vdubit on Thu Aug 30, 2007 7:23 pm, edited 4 times in total.
User avatar
alexperkins
Site Admin
Posts: 14873
Joined: Sat Nov 11, 2006 5:29 pm
Drives: 91 Golf GTI, 01 TT 225, 54 T5 174
Location: Poole, Dorset, UK.
Contact:

Post by alexperkins »

That white is a gorgeous colour - id like mine like that :D
samil87
Silver Member
Posts: 440
Joined: Tue Jul 04, 2006 1:23 pm
Location: Harrow...London

Post by samil87 »

cant wait 2c the finishd project

the white wiv blak roof and strips down the side like from an original mk 1 golf gti looks great

good luck with it all
JKM_GTI
Silver Member
Posts: 325
Joined: Tue Jul 19, 2005 10:07 am

Post by JKM_GTI »

That rocks! Can't wait to see it finished!

The strips on the side are a nice touch too! :wink:
MaxZ
Platinum Member
Posts: 1472
Joined: Mon Apr 10, 2006 10:20 am
Location: North London
Contact:

Post by MaxZ »

were you at the GTI Festival? Somehow I've managed to miss your car, well surprised not to take photos of it.
2001pologti
New
Posts: 42
Joined: Wed May 09, 2007 10:24 pm

Post by 2001pologti »

wow u going to do it yourself?

i am about to try and do mine myself any tips?
bhp addict
Getting There!
Posts: 93
Joined: Mon Apr 23, 2007 12:29 pm
Location: Birmingham

Post by bhp addict »

How much and who are you paying them to do your rear arches mate??

And are you doing your plastic welding yourself??

That lokks fantastic mate, fair play to you :wink:
vdubit
Gold Member
Posts: 619
Joined: Sun May 22, 2005 12:53 pm
Location: Exmouth, Devon
Contact:

Post by vdubit »

Thanks guys. Wasnt at gti international, the photoshop is based on tom's gti.

I'll be doing all the work myself bar the arch extensions. Thats only cos i'm pants with a welder! I did all the work last time (well, my missus helped lots(, which involved smoothing both bumpers, removing the rubbing strips (there's lots of pinholes behind them) and smoothing the tailgate. So this time round should be rather easy!

Looking forward to the plastic welding, i've tried it before and did a good job.

Any tips? Yeh, be prepared to wreck an expensive car! Just try to use as little a filler as possible, and ALWAYS use a block to sand things, hand sanding always looks pants. There's a diy guide i did in the diy section on smoothing the bumpers, although i wouldnt do the front in the same technique as it may raise like mine did.
bhp addict
Getting There!
Posts: 93
Joined: Mon Apr 23, 2007 12:29 pm
Location: Birmingham

Post by bhp addict »

It means so much more when you do the work yourself. You appreciate it alot more.

My old man was a paint sprayer so any prepping problems he can solve but I am interested in this plastic welding as I may smooth out the fog grills on my GTi and just have the grill + middle bumper grill.

Is it difficult?? I have seen your DIY thread....very helpful. thanks...you doing one for plastic welding too??

Good luck mate, hope it goes well....will look mint!!!
vdubit
Gold Member
Posts: 619
Joined: Sun May 22, 2005 12:53 pm
Location: Exmouth, Devon
Contact:

Post by vdubit »

bhp addict wrote:How much and who are you paying them to do your rear arches mate
I have no idea how much its going to cost yet! I have a mate with a garage and he's proper friendly, so hopefully not much. He's only doing the welding, i'll be doing the filler. He restores morris minors for a living, so I know his work's spot on.

Dependent on how successful the plastic welding goes I may do a guide, I'm still unsure really as of what to do. I'm sure i'll sort it one way or another.
bhp addict wrote:It means so much more when you do the work yourself. You appreciate it alot more
Thats my outlook on most things. I try to do as much as possible to my car. Its not only cheaper, but is a lot better when you say you've done everything yourself. Plus the fact nothing's that hard really. Bodywork's incredibly simple really. You just slap on filler and sand it off! Then you just press a trigger on a gun. Ok, so there's a skill to it all, but its dead simple when you think about it!

I must admit i am tempted to weld up the fog recesses, but have future plans for the front bumper (which i need to buy a spare for in order to do) so shant be bothering.

I was chatting to my garage mate in the pub last night, he's told me that i must prime the whole car (I wasn't going to) and respray the roof black (although the current paint is fine). He also wants me to spray it at his place, so I think he wants to see a good job done!

Hopefully we'll be talking show quality car in the next month then!
Sunburntfreek
Getting There!
Posts: 77
Joined: Thu Jan 04, 2007 9:24 pm
Location: Honiton nr. Exeter

Post by Sunburntfreek »

nice! chose a great colour there! you will have to bring it into marsh sometime when its done! what stage is the bodywork too at the mo?
vdubit
Gold Member
Posts: 619
Joined: Sun May 22, 2005 12:53 pm
Location: Exmouth, Devon
Contact:

Post by vdubit »

Bodywork is currently grey, looking like the second pic, only i've flatted and polished it now so its actually shiney!

I also have random bits of spray putty and filler patched all over it, where i've repaired all the dents i've added since spraying it last time.

None of the shuts have been sprayed though and it looks proper tatty, hence the change of direction!
vdubit
Gold Member
Posts: 619
Joined: Sun May 22, 2005 12:53 pm
Location: Exmouth, Devon
Contact:

Post by vdubit »

A very good guide to smoothing bumpers using plastic welding. Think i'll do the same method on mine. It shows an arosa, but same principal...

Clicky
bhp addict
Getting There!
Posts: 93
Joined: Mon Apr 23, 2007 12:29 pm
Location: Birmingham

Post by bhp addict »

that looks a little messy lol, definatly need new bunpers to do it for me, probably mess it up couple times lol.

Is there a body shop recommended for this type of work?
vdubit
Gold Member
Posts: 619
Joined: Sun May 22, 2005 12:53 pm
Location: Exmouth, Devon
Contact:

Post by vdubit »

Right then, a lil progress today. Not loads though. Finnished filling some dents, there's not much left to do now. We spent a lot of the day measuring up around the arches, and trying to work out a way to do it.

Have ordered a pair of front 6n wings, which will have the arches cut out and be welded to the rear. These should turn up tommorrow so it should be a bit wider (30mm each side to be exact) tommorrow evening.

Please ignore the purple paint, I wanted to cover up the primer from the elements so as not to absorb any water etc.

Image

Image

Image

As can be seen in the 2nd pic the rear handle has come back. The solenoid packed up that was used to pop it open, and it failed the mot, so it had to come back. I'm not sure as to whether to keep it or not as its starting to grow on me now. May spray it black for a little contrast.
Post Reply